Welcome - Explore my Blog

I've been keeping this blog for all of my beekeeping years and I am beginning my 19th year of beekeeping in April 2024. Now there are more than 1300 posts on this blog. Please use the search bar below to search the blog for other posts on a subject in which you are interested. You can also click on the "label" at the end of a post and all posts with that label will show up. At the very bottom of this page is a list of all the labels I've used.

Even if you find one post on the subject, I've posted a lot on basic beekeeping skills like installing bees, harvesting honey, inspecting the hive, etc. so be sure to search for more once you've found a topic of interest to you. And watch the useful videos and slide shows on the sidebar. All of them have captions. Please share posts of interest via Facebook, Pinterest, etc.

I began this blog to chronicle my beekeeping experiences. I have read lots of beekeeping books, but nothing takes the place of either hands-on experience with an experienced beekeeper or good pictures of the process. I want people to have a clearer picture of what to expect in their beekeeping so I post pictures and write about my beekeeping saga here.Master Beekeeper Enjoy with me as I learn and grow as a beekeeper.

Need help with an Atlanta area swarm? Visit Found a Swarm? Call a Beekeeper. ‪(404) 482-1848‬

Want to Pin this post?

Wednesday, April 13, 2011

A Look at Topsy

Today I ran by Valerie's to check on Topsy.  At my last check there was some brood but not a lot.

First I looked at the hive entrances which had signs of nosema the last time I visited.  The hive looked just the same - no new nosema on the side of the hive:


Inside the hive looked really healthy with lots of bees and lots of capped brood (about nine frames).  The combs were all built out and looked good.


On the 10th bar, the comb was heavy with honey and attached to old wax on the bottom of the hive.  As I pulled on the top bar, the comb tore off.  I set it back together again, but next time I visit that hive, I am harvesting that honey comb so that I can remove the wax on the hive bottom and can help the hive make progress.

I didn't see any new brood or eggs until I got to the 11th top bar and there were eggs and c-shaped larvae.

This hive is healthy and will have a problem if I don't get the honeycomb that is stuck to the bottom out of that hive.  Maybe I'll try for that on Sunday this weekend.

I like the top bar concept but find the hive really difficult to inspect.  The bees seem happy but I'm not sure I am.  Maybe if it were a smaller hive, I'd like it better;  maybe if I had ever seen the queen I'd like it better; maybe if I hadn't had such a hard time getting it off the ground, I 'd like it better.  As it is, I don't love working on it or inspecting it.

I also haven't figured out how to make repairs.  In the Langstroth if the bees do cross comb, a huge rubber band takes care of all my troubles.  In this hive rubber bands don't work.

Having foundationless frames in a Langstroth box makes me happier.  Maybe I like structure more than the top bar allows me.  

Sunday, April 10, 2011

Big Bee Tree as Research Aid


Remember the bee tree?  Well, the bees never moved out of the tree up into the provided boxes on the top.  Instead they have continued to live happily in the bee tree.

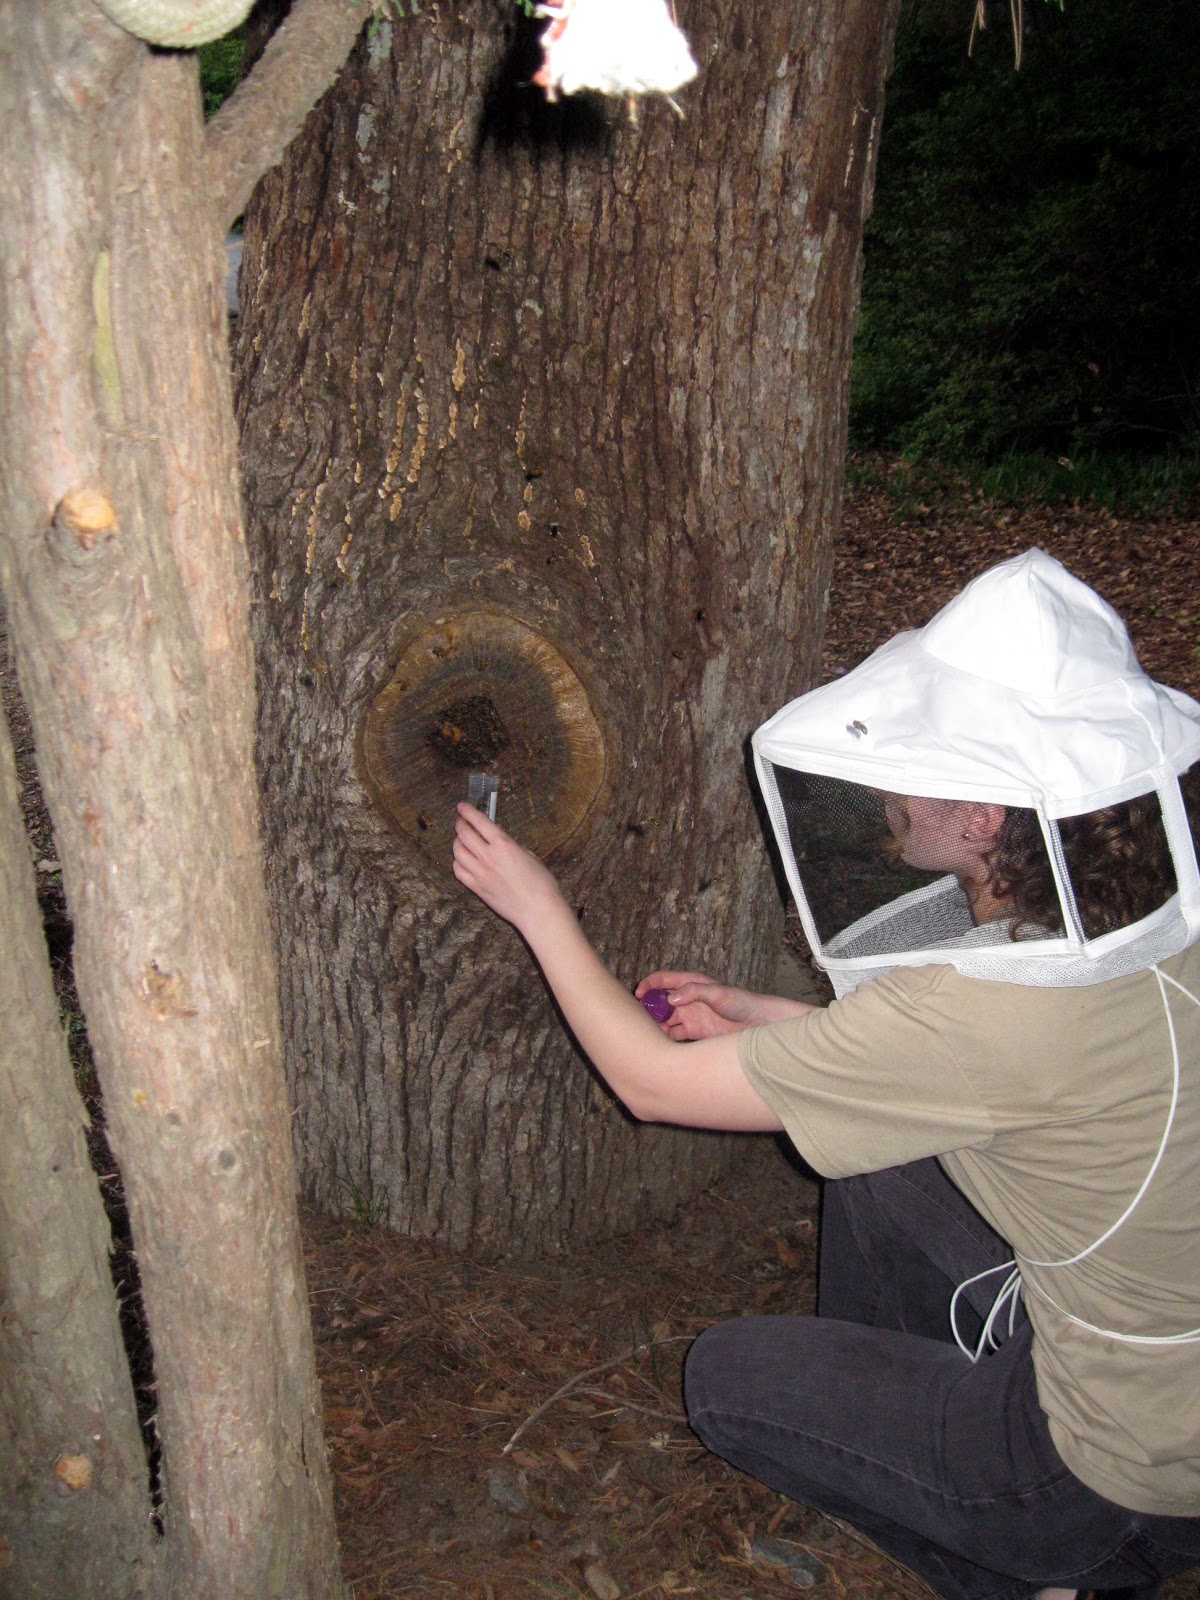
Katherine Darger is doing a research project at the University of Delaware on feral bees and their genetic make-up, with a particular interest in Africanized bees.  I'll learn more about it when she speaks to the Metro bee club on Wednesday night.  Meanwhile, she has arrived in Atlanta early to collect samples of feral bees in the Metro area to study for her research.

I volunteered the two trees I oversee for the company who removed the trees, preserving the bees.

Here's the original bee tree and the second rescued section from another tree:


Katherine used a butterfly net to collect her samples.  She swirled it all over the place and ended up with quite a few bees in the net.  (This was 7:45 at night but the bees were still flying thanks to daylight saving time.


She also collected by scooping the bees into an alcohol filled vial (these bees all died in the name of bee research).


She also coaxed them into the alcohol vial from the collection in her butterfly net.


In the end she went away with a good sampling from both trees.  I'm proud that the rescued bees can contribute to better knowledge about feral bees and their genetics.       

First Inspection in Rabun County

The hives were installed on Monday. I inspected them for the first time early Saturday morning. It was a partly cloudy day and the temperature was 62.

The bees housed in the original hive box had not taken much of the sugar syrup, nor had they appeared to empty any more of the syrup can that I had left for them. I did give each of these hives a frame of capped honey so I hoped they were making use of it.


I installed the hives on Monday and overnight we had violent winds, hail and rain in this area of Georgia as well as Atlanta. I didn't know how bad it was in Rabun County so I didn't know how much this may or may not have affected these bees.


They had released the queen. See the frayed ends of the kitchen twine attached to the queen cage? Bees dislike foreign material in their hives and do their best to figure out a way to carry it out.


In the box the bees were festooning between the frames where the queen had been. She was between frames 3 and 4 so the hive had built more on that side of the box. I added a frame between these two to make up for the missing frame space that the queen cage had occupied.

The honey frame I had left them was being well used. You can see the scraps of wax on the lower right where they have chewed away the cappings to get to the honey.


This was a large two pound package and you can see the bees peeking through the frames.


I didn't see the queen or any eggs, but there were so many bees on the occupied frames that I didn't worry. I'm going back next weekend and if I don't see evidence of the queen then, I'll be concerned.


I left the feeding situation a little different than at installation since I was worried that they couldn't get to the ziploc baggie easily enough. I left the inner cover hole partially open to the upstairs section above the inner cover and balanced the syrup can on two rocks.

Next I went to hive #2.  I brought an 8 frame inner cover and top with me to replace the jerry-rigged way I had left it on Monday.  I forgot to take a picture of the closed up hives so you can't see that I left it in better shape, but I did!


Here's a picture of the frame blocking access from the outside to the inner cover feeding arrangement.


Inside the bees were drawing wax.  Here's one of the beginnings of comb building.


There is wax under the collection of bees you see in the photo below.  They are definitely busy bees, working hard to build wax for their own use.

I saw the queen in this hive and I saw eggs.  I'm sorry I didn't get her picture - she was a vision of loveliness to me!


Here is the capped frame of honey I had left them.  They obviously used it as well.


Again I left the inner cover feeding area more accessible and left the syrup can raised up enough for the bees to access the syrup, should they need it.


I'm back in N Georgia for a conference this coming weekend and will check on these hives again.  At that time, whether they need it or not, I'll leave each box with a new box of frames because it might be a couple of weeks before I'm back in the area and they will need it since the flow has begun in Atlanta and will in a few days in N Georgia.

Many apologies to any of you who visited the day I posted this.  Something is wrong with Picasa's relationship with Blogger and for my last several posts, the pictures don't upload but remain on localhost.  I'm sorry for the inconvenience.

Friday, April 08, 2011

Making an Even Split

My hive at Blue Heron made it through the winter and we only have one other hive there. I'd like to have two hives there, so I decided to split the BH hive. It was vigorous after winter and full of bees.

I added a fourth box with foundationless frames before the first MABA inspection last month. Julia reported that the bees had not touched that box when her group inspected a week later. She did see the queen in the inspection.  I started thinking they might be planning to swarm and I should do a split or checkerboard.

Michael Bush has a guide for how to do an even split on his website and since this is an 8 frame hive, an even split should be pretty easy. Jeff skipped lunch at work so he could join me to do this. I stopped by the hive on the way to work to move cinder blocks and deliver the equipment we would need.

This hive started as a Jennifer Berry nuc so it is in a deep bottom box. I searched through my home equipment and found a deep (surprise!  Almost all of my boxes are now medium ones)  and some frames. I painted the deep box and a slatted rack and SBB for the split hive.

In an even split, you place the hive boxes for the splits facing the old hive. The entrances of the new hives will face each other. When the foragers return, they have to choose which hive because the old hive will no longer be there.


On the Beemaster forum, Brian said that I should place the new hives as if they were sitting down to dinner with the old hive, but the original hive is on the edge of an embankment so I had to put the new boxes beside the original hive.

Jeff and I arrived at 1:30 and found the hive with many fewer bees. There was every evidence that a swarm had already taken place. There was no sign of a queen. No eggs, no young larvae, lots of capped larvae, and the cells in the brood area had been back-filled with nectar.

The hive was calm, not roaring like a queenless hive.

There were at least six huge queen cells that looked far into their process.

It's still quite possible to do an even split. Only this post-swarm way both hives are at the same stage. In the usual even split, one half of the split gets the queen and the other half of the split gets the resources to make a queen.


In this already-swarmed hive, it was important for each new hive to get enough resources to survive. So first we set up the brood box with three frames for each deep box from the original hive. We located the three frames in the center of the box. We took frames 2, 3, and 4 out of the original hive and put them in the center of the new deep for one new hive.  We took frames 5, 6, and 7 in the original deep box and moved them to the center of the yellow box..


The six queen cells luckily were on two different brood frames in the second box of the original hive, a medium box.  We were careful to make sure that we put one frame with queen cells into each side of the split

In the photo below on the lower right you can see one of the gorgeous queen cells we found.  They looked pretty mature, so maybe our timing was good and the queens will emerge really soon so that the hive won't be too far behind.


In the end, we evenly shared the honey frames, the brood frames, the pollen frames between the two new hives.

This was Jeff's first hive inspection - not exactly an inspection - since we did a split, but he was great.  Here he is working on replacing frames into position.


To make the transition from a 10 frame deep to the eight frame boxes above, we put a section of 2X4 over the uncovered frames and weighed it down with a section of log.  A brick would have been better, but I didn't bring one.


After all the work and bee-disturbance, we realized that we had put the yellow boxes on the blue deep and the blue boxes on the yellow deep, but we weren't trying to be Martha Stewart, just beekeepers making an even split for the first time!

My rationalization also is that the familiar smell remains in both boxes since the blue boxes would not have the original smell of the hive - we in a sense evenly split that as well!


So this is how we left them.  Each hive has half the resources of the original hive all in the bottom two boxes.  The third box on each hive has a mix of old comb and foundationless frames.

The tulip poplar is beginning to bloom and the flow is starting, so we want them to have somewhere in which to store nectar.

The cinder blocks in the middle offered support to the old hive.  We'll move them  later.  The two entrances face one another.  We'll leave the hives this way for a week.

In a week, we'll switch the hives so the one on the left currently will be on the right and the one on the right currently will be on the left.  That should even out the populations for the foragers returning home.

Shortly after the hive swap, we'll turn the hives 90 degrees so they will face east the way the original hive did.

For some reason the pictures aren't working so here's a slideshow:


Wednesday, April 06, 2011

Violent winds in Georgia

A powerful storm swept through the South on Monday night. The precursor of the storm was the strong wind I experienced while installing the second Rabun hive.

The winds blew down trees everywhere. In driving to an 8:30 appointment at Emory on Tuesday morning, I found my way blocked on three different major streets by huge downed trees.

One of Greg's friends (a former beekeeper) down in Butler, Georgia near our hives there wondered how our hives had fared through the winds and drove over to the farm to see.  He reported that six of the hives had the  tops and inner covers blown off.

He replaced them for us and let Greg know that the bees seemed fine.  Boy, these girls have had a difficult start!

Greg wondered about Blue Heron in the winds so I stopped by on my way home last night.  A heavy limb had blown down and it looked as if it had just missed my hive.  The log on top of the hive I put there.

You can see the limb and pieces of it on the ground beside the hive.  I cleared the area and threw the limb and its parts down the creek bank   I also put a limb on top of Julia's swarm lure hivel that you can see in the background.


Tuesday, April 05, 2011

Installing Two Packages in Rabun County

I had a crazy Monday.  I picked up two packages of bees, drove to Rabun County, cleaned out the dead hive, installed the two packages, drove back to Atlanta and ran a group at my office at 5 PM on Monday.

I put the packages in hives with a mix of old comb from foundationless frames from last year and new foundationless frames with wax strips.

These packages were so difficult to work with for four reasons:

  1. The packages themselves were put together with screen wire that extended past the edges of the wood in a sharp row of extensions of wire.  I was working bare-handed and really tore up my arms and hands on these edges
  2. The queen cage had this circle of aluminum over the cork at the candy end.  It was too thick a material to put a thumb tack through.  This presented a challenge in determining how to secure the cage in the hive.
  3. The syrup container was located as it usually is but instead of being in a circle cut out to fit the can, there was an extension opening between the syrup can and the queen cage, so while I'm trying to lift the syrup container and get the queen cage, bees are coming out of the opening and crawling all over the place.
  4. The cover over the syrup can and queen cage wasn't simply stapled in but rather was nailed with a 1 1/4 inch nail - hard, hard to pry up with the hive tool.
I was anxious to try to get the syrup can out the way my Virginia mentor, Penny, has suggested by using duct tape as a handle.  It is SO difficult to pry up the syrup can.  The idea of easing it out with duct tape was really appealing.

The problem with duct tape is that bees can stick to it.  

On the first hive I pulled a piece of duct tape, taped one end to the top of the syrup and pulled from the sticky other end.  Of course a couple of curious bees died flying onto the duct tape (Death by Duct Tape!).

So on the 8 frame installation, I taped the duct tape to the top of the can and then made a handle that was stuck to itself (no exposed sticky surfaces).  So no bee deaths the second try.

Here's a slide show of the installation.  I was by myself, and although I set up the camera on a tripod,  I didn't get as many pictures as usual.


I'm going back to the Rabun County Garden on Thursday to see if the queen is released and if they are doing well.

I felt pretty good about this installation.  I remembered how to handle the feed and put it OVER the inner cover.  I was worried because there was a little space between the upper box on the 8 frame hive and the 10 frame inner cover, so I put an upside down frame there temporarily to block the opening.   I didn't want to create a side opening in the hive. When I come back,  I'll have the right sized inner cover.   


The Demise of the Rabun County Bees

Earlier this year In February,  I looked at the Rabun County hive. There were lots of dead bees on the bottom, but I didn't open the hive. There were a few bees flying in and out, but only a few.

On Monday I went to Rabun County to install a second hive.  Because I had a bad feeling about the hive in February, I took two packages to install there in case the hive had died.

I am so sad to report that the hive had starved to death with a full super of honey just above the cluster.  I have never seen dead bees so clearly defining the cluster.  It covered four frames and part of the fifth.  The cluster was round in about the diameter of a baseball and elliptical in length.  I never have had such a clear picture of what a cluster looked like in my head, so seeing it this way was helpful for learning what they look like, but what a sad way to learn.


I am so disappointed that they didn't make it.  I had high hopes for them going into winter.  I had fed them bee tea and was pretty sure there were no other illnesses in the hive.

What a loss and what a shame!

Sunday, March 27, 2011

What a Mess!

Yesterday I arrived in South Georgia to inspect the 10 hives we installed a week ago.  I was excited to see what the bees had done.

But we found a real mess.....Phrases ran through my head like "shock and awe;" "it's always darkest before the dawn;" "pride goeth before a fall."   And "What WAS I thinking?"

The guys had reported that there was a swarm of bees living in an abandoned stove on the property before I left Atlanta.  I had driven down with a hive to put this swarm into - old frames, 10 frame medium hive since I don't use those if I can help it any more.  I thought we'd capture the swarm and have a bonus 11th hive.

We started by looking at the stove at 11 AM.  No bees.  The scouts had found a good enough home and the hive and gone to better places.  We then went to Hive #10 to begin our inspections.  

Hive #10 had absconded.  Probably they were the bees in the stove.  I was heartsick.  If I had only arrived the day before, etc. etc.  

With a sinking feeling I opened Hive #9 and the bees were still there, but these bees had not built comb in the frames provided in the hive box but had built beautiful comb attached to the inner cover of the medium super we had used as a surround for the Ziploc baggie feeder.  We opened Hive # 8 and found the same occurrence; same with Hive # 7; same with Hive #6.  Every single hive had built comb attached to the inner cover and had not moved into the hive box!

Horrors!

OK, so we had to figure out what to do.  I had not come prepared for this, but we decided to cut the comb from the inner cover and tie it into our foundationless frames to get the bees going the way they should.  We ran out of rubber bands after the first hive and started using the ball of kitchen twine that I had brought.  We did this on every single hive - we worked from 11 - 3:30 nonstop and moved all the work the bees had done.

I've never had my hands in so many bees.  I got stung about eight times, but never badly until the last sting in the pad of my third finger.  The whole time I tried to move slowly and gently and we did the best we could.

However, I am so worried now - often after a hive is messed with like that, the bees abscond, or ball the queen and kill her.  Or we could have injured the queen in the transition.  

I don't know if this happened because the baggie feeder occupied 2/3 of the top bar access and they experienced it as a barrier.  I don't know if this happened because we used a medium super as a surround, thus providing them with a hollow cavity like a tree.  I just know that I am so sad about this mess.

Here are the tragic pictures. We didn't leave them with any food. The guys were going to set up a set of feeding jars in the center of the fields near each hive and everything is blooming in S Georgia now.

I'm crossing my fingers and hoping for the best.  All the hives had orientation flying going on as we left them.


Pin this post

LinkWithin

Related Posts Plugin for WordPress, Blogger...