Welcome - Explore my Blog

I've been keeping this blog for all of my beekeeping years and I am beginning my 19th year of beekeeping in April 2024. Now there are more than 1300 posts on this blog. Please use the search bar below to search the blog for other posts on a subject in which you are interested. You can also click on the "label" at the end of a post and all posts with that label will show up. At the very bottom of this page is a list of all the labels I've used.

Even if you find one post on the subject, I've posted a lot on basic beekeeping skills like installing bees, harvesting honey, inspecting the hive, etc. so be sure to search for more once you've found a topic of interest to you. And watch the useful videos and slide shows on the sidebar. All of them have captions. Please share posts of interest via Facebook, Pinterest, etc.

I began this blog to chronicle my beekeeping experiences. I have read lots of beekeeping books, but nothing takes the place of either hands-on experience with an experienced beekeeper or good pictures of the process. I want people to have a clearer picture of what to expect in their beekeeping so I post pictures and write about my beekeeping saga here.Master Beekeeper Enjoy with me as I learn and grow as a beekeeper.

Need help with an Atlanta area swarm? Visit Found a Swarm? Call a Beekeeper. ‪(404) 482-1848‬

Want to Pin this post?

Sunday, March 27, 2011

What a Mess!

Yesterday I arrived in South Georgia to inspect the 10 hives we installed a week ago.  I was excited to see what the bees had done.

But we found a real mess.....Phrases ran through my head like "shock and awe;" "it's always darkest before the dawn;" "pride goeth before a fall."   And "What WAS I thinking?"

The guys had reported that there was a swarm of bees living in an abandoned stove on the property before I left Atlanta.  I had driven down with a hive to put this swarm into - old frames, 10 frame medium hive since I don't use those if I can help it any more.  I thought we'd capture the swarm and have a bonus 11th hive.

We started by looking at the stove at 11 AM.  No bees.  The scouts had found a good enough home and the hive and gone to better places.  We then went to Hive #10 to begin our inspections.  

Hive #10 had absconded.  Probably they were the bees in the stove.  I was heartsick.  If I had only arrived the day before, etc. etc.  

With a sinking feeling I opened Hive #9 and the bees were still there, but these bees had not built comb in the frames provided in the hive box but had built beautiful comb attached to the inner cover of the medium super we had used as a surround for the Ziploc baggie feeder.  We opened Hive # 8 and found the same occurrence; same with Hive # 7; same with Hive #6.  Every single hive had built comb attached to the inner cover and had not moved into the hive box!

Horrors!

OK, so we had to figure out what to do.  I had not come prepared for this, but we decided to cut the comb from the inner cover and tie it into our foundationless frames to get the bees going the way they should.  We ran out of rubber bands after the first hive and started using the ball of kitchen twine that I had brought.  We did this on every single hive - we worked from 11 - 3:30 nonstop and moved all the work the bees had done.

I've never had my hands in so many bees.  I got stung about eight times, but never badly until the last sting in the pad of my third finger.  The whole time I tried to move slowly and gently and we did the best we could.

However, I am so worried now - often after a hive is messed with like that, the bees abscond, or ball the queen and kill her.  Or we could have injured the queen in the transition.  

I don't know if this happened because the baggie feeder occupied 2/3 of the top bar access and they experienced it as a barrier.  I don't know if this happened because we used a medium super as a surround, thus providing them with a hollow cavity like a tree.  I just know that I am so sad about this mess.

Here are the tragic pictures. We didn't leave them with any food. The guys were going to set up a set of feeding jars in the center of the fields near each hive and everything is blooming in S Georgia now.

I'm crossing my fingers and hoping for the best.  All the hives had orientation flying going on as we left them.


Saturday, March 26, 2011

What I Take to a Bee Hive Inspection


Once Jerry Wallace gave a great program on what he takes to an inspection. I talked about my re-purposed knitting bag as a bee bag in an earlier post, but thought you'd like to see the contents all laid out (upper left to right)

Flour sacking towel for hive drape
Squirt bottle with sugar syrup in it
Kitchen twine
Wet ones to clean hive tool between hives
Frame gripper
Thumb Tacks
Benadryl
Baby powder (on your hands it keeps bees away and if you use nitrile gloves it helps to slide them on)
Hive tools - prefer to use a different one with each hive as per Jennifer Berry
Plastic Zip Locs for whatever
Magnifying glasses
Swarm lure (in jelly jar)
Large rubber bands
Lighter for smoker
Swiss Army knife
Pruners
Sharpies
Ball point pen
Nitrile gloves
Bee Brush
Frame rack
Clip board with notepaper on it

OK, that's it. What do you carry in your hive kit that I don't?
Posted by Picasa

Friday, March 25, 2011

Setting Up an Old Hive as a Swarm Lure

As you know, my hives on my deck died last fall so I went into the winter with no bees at home. I do have the hive boxes and drawn comb from the defunct hives. I decided to set up one of the hives in my yard as a swarm lure.

I set two hive boxes up with old drawn comb. I took the swarm lure that I made a couple of years ago with lemon grass essential oil (still smells great and lemony) and put some on the hive.


I smeared swarm lure on the landing.


I smeared swarm lure around the hole in the inner cover.


I smeared a little swarm lure at the front of the frame bars in the top box.


The comb in the hive is this past year's comb (only a year old) so it still looks pretty good from when the bees made it.


Now, if I'm lucky and the scout bees fly my way, I may capture a swarm through little effort on my part.
Posted by Picasa

Holly: A Bee Treat

When Dr. Paul Arnold analyzed my honey a couple of years ago, he said that it was predominately flavored by holly. I had never paid attention to the holly when it bloomed, although I always appreciated the resulting red berries. I have two types of holly in my yard and I can smell the sweetness that informs the honey in the bloom.

The pictures below don't have any honey bees in them, since right now my home apiary is bee-less, but you can see the flower and how intense it is. I wish there were bees on these blooms gathering nectar.....


Posted by Picasa

Thursday, March 24, 2011

Topsy Check

Today Jeff and I did a quick Topsy check over lunch. We hadn't opened this hive since spring came around. First thing we both noticed was that there were signs of bee poop around both entrances. This could mean nosema or it could mean desperate release after the cold weather. In any event, we documented it with a photo and will see if it's worse when we return.


More bee diarrhea around the entry hole.


First we pulled up the honey comb. Losts of beautiful new wax. Some was cross-combed and we broke it off and tried to straighten it out.


You might remember that we put some old comb into the hive to make it smell attractive to the bees. We tried to lift this one honey comb and found that the bees had barely attached it to the top bar. They had attached it to the sides and to the old comb in the bottom of the hive. We didn't try to move this but we did remove all the old comb except this one piece from the hive bottom.

I don't know what to do with this errant comb - especially since they are storing honey in it.


The first comb at the beginning of the hive was being used for honey storage.


The second comb and several others contained brood and young larvae. We didn't see the queen and in the glare of the 1 PM sun, we couldn't see eggs, but obviously the queen is laying and building up her numbers.


On the down side of things, we saw 2 hive beetles and killed one wax moth larvae. In this photo magnified, I can see two bees with DWV (deformed wing virus) which is vectored by the varroa mite, but I don't see any varroa on the backs of any of the bees.  We also (on the down side) still at some point need to deal with the errant comb - maybe we just harvest it so the bees have room to expand the brood nest.
Posted by Picasa

Installing Ten Packages at Linda T's Bees

Last weekend we installed ten packages of bees into our ten new hives.  We fed each installed hive one gallon baggie of sugar syrup.  We left the bees and will return this weekend to see how they have fared.

Here's what we did to install the packages.  At each hive we put an empty super on over the hive box.  The function of this super is to contain the bees as they are shaken into the hive.  The empty super also serves as a surround to allow interior feeding of the bees both with a baggie feeder and with the jar of syrup that came with them.

Then we pried off the wooden cover over the syrup, worked the syrup feeder out of its place, removed the queen cage.  We took the cork out of the candy end of the queen cage and wedged the cage, screened wire down, between two frames near the center of the hive.  We also tacked it just to be sure.

Next we shook in the bees and either added the baggie feeder before or after adding the bees.

We'll check on them on Saturday this week and see if the queens have been released.

I was working hard through this process and didn't take as many pictures as I often do....but FWIW, here they are:


Monday, March 21, 2011

Bee Sting: Myth or Med

I've always heard that bee stings help with arthritis and other aches and pains; that eating local honey prevents allergies; that eating propolis is preventive medicine.  I rarely get stung and these days when I do get stung, a couple of hours later, I can't even tell you where I was stung.

As you may remember from my earlier post, I had 120,000 bees in my kitchen in packages overnight on Friday night.  Whenever you take bees from a beeyard, inevitably some bees come along for the ride who aren't a part of the package or nuc.  These 12 packages were no exception.  A few homeless bees clung to the outside of the packages housed in my kitchen.

 When I reloaded the packages into the car the next day, all the clinging bees did not choose to go into the car with their sisters.  I noticed on Saturday night that there were some errant bees clinging to my kitchen window blinds.

On Sunday when I arrived home from dinner with my daughters, I saw that my dogs had dislodged the rubber pet door from its screws.  I knelt down to take the door off of its base with a screwdriver.  I had on a sleeveless vest and a long sleeved shirt over it.

Suddenly I felt a piercing pain in the tender flesh of my left underarm.  It burned and felt sharp and uncomfortable.  I looked down on the floor and saw my tormentor, a bee from the clingers on the packages.  I guess she was in the vicinity of the pet door and flew up into my exposed underarm.  It was the most painful sting I can remember.

In the January snow a couple of months ago, I took the dogs for a walk and fell hard on the ice.  Catching myself, I injured my left biceps muscle and have had a hard time getting comfortable to sleep every night since then.  I lie down and feel a tearing pain in my upper arm.  I move around, move around, move around until I find a place where my arm hurts the least before being able to sleep.

Last night for the first time since I fell, I went to sleep with absolutely no pain in my upper left arm.

I'm a believer.  Thank you to the bee who stung me in such a vulnerable, painful place.

Sunday, March 20, 2011

Laying Worker, Lost Hive

After we picked up bees last weekend, Julia and I went over to her house to inspect her big hive, Poppy. The hive was thriving. We saw lovely brood in the top boxes.


We saw her majesty and she allowed a photo opp! (I am so glad to get a really good picture of her!)


Julia's other hive was quiet. Only a few bees went across the threshold while we worked on Poppy. When we finished Poppy, we opened the hive (called Leslie's hive),and found only enough bees to cover a frame or so and we didn't see brood, to speak of.

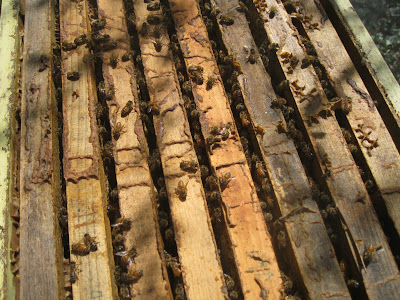
As we examined the frames we discovered cells with several eggs in each cell. This is a clear sign of a laying worker.

See the eggs in the cells below? They don't stand as upright as when the queen lays them and several cells have more than one egg in them.


The old way of thinking says that if the queen is alive and active in a hive, her pheromone production serves to suppress the hormones of the workers. All the workers are fully developed females but they have not been fertilized. Consequently a worker is only capable of laying drone brood.

However, without the pheromone of the queen, the survival instinct of the hive would inspire a worker or workers to begin becoming "productive" at least as much as they can without fertilization females.

However in the Wisdom of the Hive, Seeley says that it is now "clear that the pheromones that provide the proximate stimulus for workers to refrain from laying eggs come mainly from the brood, not from the queen." (Seeley, Wisdom of the Hive, 1995, p. 11) This determination came from Seeley's own study in 1985 and one by Willis Winston, and Slessor in 1990.

Seeley also writes that in a queenright colony, the worker bees police the worker-laid eggs, destroying them when they find them. Isn't that interesting. From a Darwinian point of view, it is for survival of the fittest, but too complex to go into here.

Julia brought the frame in and took the photo below of the frame with no bees on it so we could better see the multiple eggs.


Posted by Picasa

Friday, March 18, 2011

There are 120,000 Bees in my Kitchen

When Julia and I arrived at my house we parked my car in the carport and opened all the doors and windows.  Maybe I would just leave it there, all opened up until tomorrow morning when it was time to go to S Georgia.

We went to lunch (in Julia's car) and worried about the bees - it was supposed to be 80 degrees today in Atlanta and what if they got too hot?  So over lunch, Julia suggested that I take them into the house two at a time, maintaining the nailed-together status.  Maybe, she said, I could slide them onto something like a cookie sheet.  Then it dawned on me - my pizza peel!  Nothing like re-purposing a kitchen utensil for a beekeeping purpose!

Here I am sliding two packages onto the pizza peel.


We did have to saw one set of four boxes apart (I'll duct-tape them back together in the AM) But otherwise they all came into the house easily on the pizza peel.


And then my kitchen was FULL OF BEES!  My dogs didn't know quite how to make sense of this.

One industrious little bee (see the lower right of the package below) walked all over the screen trying to find a way to remove a sliver of wood from their living space.


So here's how it sounded in my kitchen at 4 PM on March 18, 2011:


Posted by Picasa

Picking up Bees from Don (aka Fatbeeman)

Today Julia and I drove to Lula, Ga to pick up bees from Don. She was getting a package for Blue Heron and picking up another for a friend. I was picking up 10 packages for Linda T's Bees in South Georgia and getting two packages for another friend.

When we arrived, Don was shaking a package into a nuc. He is using an empty medium nuc box as a funnel to help contain the bees as they are shaken.


Now he is taking the cork out of the candy end of the queen cage. He wedges the queen cage, screen wire down, in between two frames and leaves her for the bees to release. (The man in the white shirt just got stung right in the middle of his forehead).


Now Don is closing up the nuc before taking us to his basement to pick out our packages.


It's always fun to see Don in action. (The white-shirted man is trying to scrape the stinger off of his forehead!)

 
All told we were picking up fourteen packages in the back of my Subaru.  It's important that the bees not overheat in transit so Don nailed them apart using pieces of wood to keep the packages separate and to keep them upright.


With the car all ready to roll, I got Julia to take my picture with Don.


We drove back to Atlanta with a car full of bees and only a few loose in the car at the back window.

Thursday, March 17, 2011

Observations about the Wax Tube Fastener

After using the wax tube fastener (which came with no directions) for a few years, I am learning some additional helpful hints and want to pass them on to you. If you want to see my original wax tube fastener saga, you can find it here.

Today we waxed strips into 65 frames for the hives in South Georgia.  To do that many takes a lot of wax.  I melted the wax in my converted Presto Pot that I bought on EBay.

I never use canned vegetables in my kitchen, but I bought a can of asparagus just to satisfy my wax tube fastener need.  You can see the now empty can of asparagus being put to use as a wax container in the photo below.  It's just the right depth for the wax tube fastener.

However, as we worked through the 65 frames, we had to refill the can several times.  As the hot wax level lowered in the can, it was no longer high enough to fill the wax tube fastener completely with wax.  The consequence of this was that the wax residue in the upper part of the tube near the handle solidified, interrupting the vacuum created when you cover the invisible hole on the black handle.

You can see in the photo below from the wax residue on the outside of the asparagus can that the molten wax was about half way up the pipe end of the WTF.

 
To combat this problem, I had two pans of boiling water going on the stove while we worked.  One pan was simply boiling water.  The other heated water contained the filled asparagus can with the wax tube fastener inside the can.

I refilled the can every time it got to about this depth (see photo below).  Because at this point the WTF was not functioning well since the vacuum had been disrupted, while I refilled the asparagus can, I put the WTF in the other pan of boiling water.  This served to melt the wax in the pipe so that the flow could start again.  I lifted the WTF out of the boiling water and allowed every drop to flow out of it before returning it to the melted wax in the can.

This process was much less frustrating than having the tube suddenly appear to quit working.  I also kept a toothpick around to run in and out of the hole in the handle occasionally to keep that path clear as well.

 
My parents grew up in the Depression and instilled in me an approach of "Waste not, want not," so I didn't want to lose any of this precious wax.  It's all I have and when it's gone then I'll have to figure out another way to stick the wax starter strips in the frame grooves.


Meanwhile in the roasting pan that I used to hold the frames I was waxing, I line the bottom with a piece of waxed paper.  We, of course, dripped wax all over the waxed paper.  When the job was done, I put the paper lining, covered with wax drippings, into the freezer.

After an hour in the freezer, the wax dripping just popped off the paper.  I put the peeled and popped off wax into the Presto Pot for future melted wax needs.  I always let the wax cool in the pot, ready to be remelted for the next waxing occasion.
 

And from the Depression era thinking, I am now letting the water cool in both pans from the stove.  In the morning, I'll peel the cooled wax off of the top of the water and add that to my wax collection.
Posted by Picasa

Wednesday, March 16, 2011

Registration for Young Harris is now Open

The Beekeeping Institute at Young Harris College in north Georgia is put on jointly by the UGA Honey Bee Program and Young Harris.  In Georgia and really in the Southeast, it's the premier place to go to learn the ins and outs of beekeeping.

There's an advanced track and a beginning track.  It's the place where one can become a Certified, Journeyman, Master, or Master Craftsman beekeeper in Georgia.  This year there are some great visiting lecturers including Debbie Delaney whom I heard talk about bee genetics at EAS last year; Dr. Yves LeConte who is director of bee research in Avignon, France; and Jerry Hayes from the Florida Department of Agriculture.

Many people who earned their Master Beekeeper at the Institute are also teaching in the program (including me - I get to teach Low-Tech Beekeeping).  And you'll get to hear Jennifer Berry (who writes regularly for Bee Culture), Cindy Bee (one of the best beekeepers in the country), and Keith Delaplane who is not only the  head of the UGA Department of Entomology but the author of a book many beginning beekeepers use: First Lessons in Beekeeping.

The program only takes 150 people and it has filled up the last few years, so if you want to go, register soon!

Sunday, March 13, 2011

Blue Heron First Real Inspection 2011

I am thrilled to report that this hive made it through the winter and is going great guns! There were lots of bees and lots of brood throughout the hive. They are healthy looking - I didn't see any Varroa and no other bad signs and they seemed nonplussed by my intrusion.


Next time I am going to take a tripod. I didn't get good pictures. I was by myself and didn't check the camera settings. The camera was still set on Kids and Pets from taking pictures of my grandchildren the day before.


I used the purchased hive drape to cover the hive except for the frame I was removing. As you can see on the left in the above picture, I also draped the boxes I removed.

I was concerned about this hive because the bees were still in the bottom box after the winter with a solid box of honey above them. Often the queen will not cross a honey barrier like that and she is said to be honey-bound. I looked at the old capped brood in the bottom box. All but the outside two frames were being used for brood. One frame had a perfect football shaped pattern, all the center had emerged and new eggs and larvae now occupied the space.

I took off the second box - it's full of honey and the comb is often cross-combed with two frames joined by comb between them. The honey in that box is all composed of "bee tea" syrup driven honey so it is only good for bee food. I took the box off of the hive and set it aside to decide what to do with it.

I was so surprised to find that Box three contained lots of beautifully drawn comb and new capped brood as well as young larvae and eggs. I didn't see a queen cell anywhere, nor any drones. In this third box, however, I did see some drone brood (see the picture below).


And then I saw her. I so regret that bad picture - I took THREE bad pictures! Anyway, I outlined this absolutely gorgeous queen so you could see her. She was large and long with an all golden abdomen. If you click on the photo below, you can see that I've outlined her in red.

 Right in front of me, she lowered her abdomen and laid an egg....privacy notwithstanding. She was beautiful and brave - she had crossed the honey barrier to continue her egg laying in the box above it where there was space for the taking.


Every frame in every box was being used so I added a fourth box of foundationless frames. I actually put it in position 3. I took a frame of nectar from the side of Box 2 and put it in the middle of Box 3 (the new box) to help the bees know how to build the comb in the frames.

I replaced that frame in Box 2 with a foundationless frame.  I also marked all the frames as per Housel positioning.

Julia is inspecting this hive on Saturday and we'll see if they have built any comb out by then.

I then decided to put the honey barrier box on as Box 4 and wrote on it in magic marker "Bee Tea Honey" and "Cross Comb". I will not harvest this honey for eating because of the bee tea. If the bees don't use it, I'll probably collect it and feed it back to the bees so that I can make use of the honey and straighten out the cross comb.

And now I'm going to enter my adventure on Hive Tracks and go to the kitchen and wash my hive tool which is gunked with propolis as often happens in the first inspection.
Posted by Picasa

Preparing Hive Inspection Gear

This week marks the beginning of my hive inspections for my hives in Atlanta. I spent some time on Friday getting my gear in gear. I washed all my hive tools and scrubbed their ends with a brass scrub. The yellow one was caked with propolis and took some elbow grease to get clean. I plan to wash used tools at the end of every inspection this year and I plan to carry a container of Wet-ones with me to wipe them off on site.

This is an effort to prevent disease spread from hive to hive.


What's in my hive bag? Two magnifying glasses are there to help people see eggs when I have people accompanying me on inspections.


I also carry, as you can see in the photo below, a propane lighter for my smoker, two permanent markers to write on frames or hive boxes if need be; a container of Benadryl for a sting reaction, a bee brush, a drape for the hive, some baby powder to use if I wear nitrile gloves; several hive tools, a container of thumb tacks, a pair or two of nitrile gloves, a couple of empty ziploc baggies, some rubber bands; a paper towel or two; and a jar of swarm lure that I made.


There may be a couple of other things in there - oh, yes, my Swiss army knife, a frame rack, some string, my leather bee gloves, a pair of pruning shears.

I bought this container at a knitting class I took at the John Campbell Folk School but I kept losing things in the deep pockets.  It never was a knitting bag, but is actually a tool bag - the knitting folks re-purposed it, but it didn't ever really work for me.  It works great as an inspection bag.


So I'm ready to inspect Blue Heron on Sunday and Topsy on Tuesday.
Posted by Picasa

Pin this post

LinkWithin

Related Posts Plugin for WordPress, Blogger...