Welcome - Explore my Blog

I've been keeping this blog for all of my beekeeping years and I am beginning my 19th year of beekeeping in April 2024. Now there are more than 1300 posts on this blog. Please use the search bar below to search the blog for other posts on a subject in which you are interested. You can also click on the "label" at the end of a post and all posts with that label will show up. At the very bottom of this page is a list of all the labels I've used.

Even if you find one post on the subject, I've posted a lot on basic beekeeping skills like installing bees, harvesting honey, inspecting the hive, etc. so be sure to search for more once you've found a topic of interest to you. And watch the useful videos and slide shows on the sidebar. All of them have captions. Please share posts of interest via Facebook, Pinterest, etc.

I began this blog to chronicle my beekeeping experiences. I have read lots of beekeeping books, but nothing takes the place of either hands-on experience with an experienced beekeeper or good pictures of the process. I want people to have a clearer picture of what to expect in their beekeeping so I post pictures and write about my beekeeping saga here.Master Beekeeper Enjoy with me as I learn and grow as a beekeeper.

Need help with an Atlanta area swarm? Visit Found a Swarm? Call a Beekeeper. ‪(404) 482-1848‬

Want to Pin this post?

Showing posts with label candles. Show all posts

Tuesday, October 14, 2014

Fun and Facts about Wax

Last week I was the speaker at my local bee club meeting.  I have given lots of talks and wanted to try something different so I talked about Fun and Facts about Wax!  I covered a lot of facts about wax and then talked about melting it, employing it in making candles, lip balm, lotion, swarm lure, etc., and ended with enjoying it.


I am giving the same talk at the Potato Creek Beekeepers Club in Griffin, GA on Thursday, November 20 at 7 PM - here's where they meet in case any of you are in the area and want to come:
Spalding County Extension Office, located at 835 Memorial Dr., Griffin, GA 30224

A few fun facts that I had such fun collecting!
  • Wax has been found in shipwrecks that is extremely old and still is a lovely product
  • Beeswax has always been valued because it burns slowly and without smoke
  • Back in 181 BC (a long, long, long time ago) the Romans conquered the Corsicans and then taxed the Corsicans 100,000 pounds of beeswax a year
  • Like honey from China is contaminated with things other than honey, wax in ancient times was often extended with things like sand so guilds developed to protect the purity of the product.  Some of those guilds are still in existence today
  • One pound of beeswax supports 22 pounds of honey - that means that in a medium ten frame box, which full of honey holds about 40 pounds (4 pounds/frame), the amount of beeswax in that same box would be a little less than 2 pounds.
I could go on and on.....so many fun facts to learn about wax.  

Of course one of the most important facts about wax is that if you are not going to use it right away, don't let the wax moths have a feast.  Store it in your freezer!


I get asked a lot to give talks but this was a particularly fun one - I think because often I am talking about topics that get controversial reactions - like foundationless frames, crush and strain honey harvesting, simple beekeeping.  

This topic was universally accepted and I think everyone there enjoyed the talk - or at least a lot of people came up afterward to tell me they did.

Potato Creek is a new bee club which I am proud to support.  GBA has a number of new bee clubs and this one was just welcomed into GBA at the fall meeting.  So if you are around, come to the meeting on November 20 and hear my talk about Fun and Facts about Wax!


(Bear Kelley, president of the Georgia Beekeepers Association and 2014 Beekeeper of the Year, is the speaker in October:  On the 16th)

Friday, July 26, 2013

Candle Making Workshop in Rumsiskes, Lithuania.

IMG_0177IMG_0169IMG_0170IMG_0173IMG_0175IMG_0176
IMG_0182IMG_0200IMG_0174IMG_0178IMG_0179IMG_0180
IMG_0181IMG_0183IMG_0186IMG_0184IMG_0188IMG_0189
IMG_0190IMG_0191IMG_0193IMG_0195IMG_0196IMG_0197
Candle Making Workshop in Rumsiskes, Lithuania., a set on Flickr - click on the link at the beginning of the sentence to see the slides instead of these small thumbnails.
On the third day of our Lithuanian tour we went to the historic community open air museum near Rumsiskes. The area is set up in fragments of villages. It was established in 1966 and is a wonderful depiction of Lithuanian life with 140 buildings, flower gardens, orchards, etc.

We were lucky to get to take a candle making workshop and each of us got to try the old-fashioned way of pouring candles.

We discovered that the wax has to be kept at a relatively low temperature - I think wax melts at 140 degrees F. If it gets warmer than that, it won't harden on the wick and just slides right back down into the bowl.

In the end you get a candle that is long and pretty, but a little out of shape. A rolling pin/board is then used to even it up and to make an end for a candle holder.

We each went away with a candle and had a great time - not to mention a really good lunch of traditional food. To see the labels on the slide, click on each individual slide.
Created with flickr slideshow.

Saturday, January 02, 2010

Making Tea Lights

At the Metro Beekeeper Holiday party, I asked my friend and fellow beekeeper, Jason, about making tea lights. Jason makes lots of them and provides them for the Metro Atlanta Beekeepers short course (coming up on January 23). Jason told me that if I tried making tea lights, I would wish for a mold that he has.

I tried with the 100 tea light forms that I had ordered from Brushy Mountain. Like Jason warned me, it was a messy and less than perfect process. I did end up with tea lights to attach to all the Christmas presents I gave this year and to use as stocking stuffers in the stockings I fill for my adult children.

I set all the molds in an aluminum foil lined cookie sheet. Waxed paper would have done as well as a liner. I didn't want to be scraping wax off of the cookie sheet when I wanted to use it later actually to bake cookies!

I set the mold forms up with a wick in the center of each. I melted the wax in the top of a double boiler that I purchased on EBay just for bee product production. Then I poured the melted wax into a plastic measuring cup with a pouring lip and poured wax into each of the molds. You can see on the photo where I over-poured the wax, resulting in wax on the aluminum foil liner as well as creating something that had to be removed from the exterior of the form before giving the present away. What a mess!


The wicks didn't want to stay in the center or to stand up straight.


It is a gratifying way to use wax, however. The little lights pour up quickly. The candles actually burn beautifully and well. Beeswax has a longer burning life than other types of wax so for tiny lights, they last for a long time.


Here they are as they come close to the end of the solidifying stage.


We used a collection of tealights in the center of our Christmas Eve dinner table. Our dinner started at around 8 and didn't end until after 11 and the tealights started going out in the middle of dessert. I was amazed that they lasted that long.


Posted by Picasa

Monday, September 29, 2008

Candle Results


The candles came out just fine. I took them to the Ga Beekeepers' Association show but then found out the only way I could enter them in the show was in a holder - and I didn't bring one with me.

We did burn them at my mountain house and they were just lovely. I can't wait to make more. I learned a lot with this group but they did have depressed ends (at the tops of the mold). I filled it in with wax, but it left a line. There must be a way to do this better and I'll research it on the Internet before I try again.
Posted by Picasa

Thursday, September 25, 2008

Pouring Candles

Today some mold release that I ordered from Brushy Mountain and a candle mold arrived on my doorstep. I was so excited that I had to try it out right away.

I was planning to melt wax tonight anyway since I'm trying to get a good wax block to take to the Ga Beekeeping Association Honey Contest. Keith Fielder, a Master Beekeeper - one of the few in Georgia, wrote me with some helpful hints so I poured this block using his hints - but he made me promise to keep his secrets, so I am not sharing them here.

Suffice it to say, my first effort was almost good enough and the second effort is solidifying in the oven as we speak. However it turns out, I will enter it in the show, if only to be able to thank Keith through my actions (using his methods to try for a good block).

I melted last year's wax block to make candles. Threading the wicks made me want to SCREAM. My wicks have been waxed (ie, I dipped the wick in melted wax) and that made it a little easier to thread them through the holes and the length of the mold. However, I couldn't get the wick to go through two of the holes - so I didn't make candles in those mold sections.


After threading the wicks into the molds, I tied them to bamboo skewers to hold the wick in the center of the candle while the liquid wax was being poured.

The directions that came with the mold said to put a wet sponge in the freezer to get it really cold and to set the mold on top of the frozen sponge. Thus when the hot wax leaks out of the tip of the candle which is against the sponge, the tip of the candle will quickly solidify! Who knew?

It was a messy process as you can see above. As the candles cooled, they shrank, leaving a concave space on each candle. I remembered from taking class with Virginia Webb that sometimes you have to go back and fill that area with wax, so I remelted some wax and did exactly that - see the picture below.

I don't think these candles will go to Ga Beekeeping meeting with me, but I am taking the wax block, my honey, my cut comb honey, my chunk honey, and I believe that will be all. It's a little silly for me to enter a state level contest, but I figure why not make the effort since I am going to be up there anyway and my honey is still bottled in good shape from the Metro contest.
Posted by Picasa

Monday, September 08, 2008

The Saga Continues

This may be it - it isn't perfect, but I give up - this is the 15th pour and I've had it with trying for perfection. I'm getting in the boat with the Amish who make mistakes in their quilts on purpose because they believe it is an affront to God to think that any human can achieve perfection.

And the Metro Beekeepers Annual Honey contest, Auction and Picnic is this coming Sunday so time is running out.

I poured this in a glass dish lubricated with dishwashing detergent. I've tried PAM, dishwashing detergent, Crisco, and Silicone Spray. The latter had to be sprayed outdoors and could only be used in a metal pan. I was so afraid that the chemical smell would ruin the wax. That pour had divots in it but popped right out of the pan. Thus I'm up to POUR 15......grrrr.


It cooled well and popped out of the pan looking shiny and lovely. The glass pans work well for smooth sides, but it's hard to pop out of the pan without flexible sides. Looks perfect, right?


But no, right in the center of the top are these tiny marks from the dishwashing liquid pooling on the bottom of the pan or maybe, since this spot is in the location of where the first wax went into the pan, they are the result of the pan not being hot enough. Usually when I pour I have the pan sitting in another pan of boiling water. This time I poured and then put the water around the pan. Maybe this is where the wax cooled faster than the rest since it was first in the pan and then the hot water didn't remelt it. Who knows?

I have been polishing it with a knee high stocking like crazy. Here's the damaged part:


I have polished and polished and it's looking better. I also poured Pour 14 at the same time with some darker wax. It didn't come out well - looks great but has three bubble holes on the top - small ones but quite obvious. I may pour that wax again into the pan of #15 and see. If it's better than this one, I'll use it, but otherwise #15 enters the contest on Sunday.

There's a fabulous candle maker in our club - she makes candles that look like bundles of asparagus, pine cones, etc. and they all come out of the molds perfectly. I'm trying for second or third place with this small attempt below. I poured my extra wax into silicone cupcake holders that I had poked a hole in and inserted wicks. I think they turned out cute. I can only enter one of them but the one on the upper right is perfect, so it will enter to try for 2nd or 3rd place.

Posted by Picasa

Friday, August 22, 2008

In Which I TRY to Make Candles

I have a book on candlemaking that I've had since the fifth grade which was the first and last time I tried on my own to make candles. I took a class in beekeeping at the John Campbell Folk School. Virginia Webb taught the class. In between learning about the bees, we made candles, but I never had to wick the candle molds.

My wonderful daughter, Valerie, gave me a rubber mold for votive candles two Christmases ago and I haven't ever used it (I'm a little cowed by it). Today I got it out to make the effort. I tried and tried but couldn't for the life of me get the wick to go in the tiny holes punched in the bottom of the candle mold.

I called my friend Martha Kiefer, Georgia's 2007 beekeeper of the year. Martha makes gorgeous candles. Martha said to use a yarn or upholstery needle to thread the wick into the mold. Martha also advised me to wax the wicking. I was melting wax for my wax block so it was no big deal to add wicking to the leftover melted wax.

The waxed wick easily threaded through the eye of the yarn needle.


Then I poked the needle into the hole in the bottom of the candle mold.


I melted some of my lovely solar melter wax and look what I got as a result! I only made these four but now at least I know how to do it.

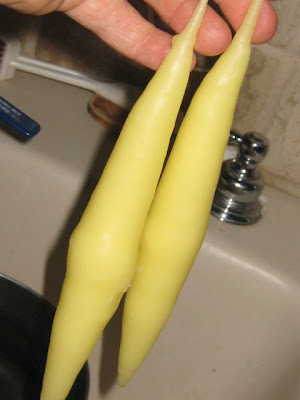
Then, feeling my oats and feeling quite inspired, I thought why not make dipped tapers. The examples below illustrate exactly why not. This was my first attempt. I can't wait and do plan to melt these back to liquid and try again.

The problem is that as I dipped the taper, a drip started lengthening on the bottom of the taper, thus making it harder to dip the taper as deep as I would like. There's got to be a way to avoid the candle growing in that direction.

I'll check the Internet and try these again. It was fun, just the end result isn't the lovely taper I was expecting!
Posted by Picasa

Pin this post

LinkWithin

Related Posts Plugin for WordPress, Blogger...