Welcome - Explore my Blog

I've been keeping this blog for all of my beekeeping years and I am beginning my 19th year of beekeeping in April 2024. Now there are more than 1300 posts on this blog. Please use the search bar below to search the blog for other posts on a subject in which you are interested. You can also click on the "label" at the end of a post and all posts with that label will show up. At the very bottom of this page is a list of all the labels I've used.

Even if you find one post on the subject, I've posted a lot on basic beekeeping skills like installing bees, harvesting honey, inspecting the hive, etc. so be sure to search for more once you've found a topic of interest to you. And watch the useful videos and slide shows on the sidebar. All of them have captions. Please share posts of interest via Facebook, Pinterest, etc.

I began this blog to chronicle my beekeeping experiences. I have read lots of beekeeping books, but nothing takes the place of either hands-on experience with an experienced beekeeper or good pictures of the process. I want people to have a clearer picture of what to expect in their beekeeping so I post pictures and write about my beekeeping saga here.Master Beekeeper Enjoy with me as I learn and grow as a beekeeper.

Need help with an Atlanta area swarm? Visit Found a Swarm? Call a Beekeeper. ‪(404) 482-1848‬

Want to Pin this post?

Showing posts with label wax tube fastener. Show all posts

Wednesday, April 15, 2015

Speaking to Coweta Beekeepers

On Monday night in terrible Atlanta weather, I spoke to the Coweta Beekeepers near Newnan, Georgia.  They have a great facility for meeting - it's professionally set up and nearly perfect.  They meet at the agricultural center for their county.  I wish we had more farmers in downtown Atlanta so we could have such a facility available.

There are extension agents in North Fulton and South Fulton Counties, but that's a long haul for us city folks.


(Thanks to Debbie Lorincz, a Coweta member, for taking these photos)

I talked about ways to make your beekeeping simpler.  It was fun.  It's a talk I've given often with some variation from previous times, but I had a good time giving it and the questions were great.  I talked about hive box size, foundationless frames, water sources, entrance reducers, crush and strain honey harvest....

I've had emails from a number of the club members - which is always nice afterwards.

Tomorrow I'll be speaking to the Mecklenburg County beekeepers in Charlotte, NC.  It's a very busy bee week.  Then I'm driving to Rabun County to check on my bees at Robin and Mary's house.

Wednesday, May 07, 2014

Truly, Madly, Completely Foundationless Frames

As most of you know, I don't use foundation.  I have gone through quite an evolution of approaches to reach what I am doing this year.

In the very beginning I used thin surplus wax foundation because I didn't think plastic was natural and didn't want it in my hives.  Then I started following Michael Bush and cut wax strips.  I waxed them into the grooves in the frames to give the bees a starting point.  Then the next year I decided after listening to Jennifer Berry that we were all better off with NO commercial wax with its chemical composition of fluvalinate and coumaphos.  So then I started using craft sticks glued into the groove.

In December on Christmas Day I slipped on ice while hiking in N Georgia.  I didn't know it then, but I tore my posterior tibia ligament and I have been slowly, s...l....o.....w......l......y healing since then.  I still am wearing a wrap on my ankle and tennis shoes every single day.  When bee season started, standing for a long time meant a terrible burning sensation around my ankle bone.

So I have been doing lazy beekeeping.  When my frames have old comb in them that needs replacing, I remove the old comb.  But I haven't been waxing or gluing ANytHing in and the bees are making beautiful comb without my giving them any starting place.

The photos are blurry - I used my iPhone and it doesn't accommodate my shaky hands.

Old comb:


Tear out old comb (really blurry, but it falls into a box of removed comb):

In a stewpot of boiling water, immerse the frame for 30 seconds.  Obviously the whole frame won't fit into the stew pot so I put in one half and then the other.

It isn't in the water long enough to even think about warping and all the wax melts off.  Meanwhile because I do four boxes worth of frames in one stew pot, the water in the pot is laced with melted wax so the frame gets slightly coated with melted wax.  This alone may stimulate the bees to build comb.

I use a skewer or a hive tool or whatever I have to slide along the groove and effectively mess up the patterns for any crooked comb left by the bees.  In the photo below, the right side of the frame has been submerged already and the left side still has old comb on it.  


The water is boiling hot so it quickly evaporates and the frames are ready in seconds to be put back in the hive box.  


With nothing but their bare nakedness, I put the frames onto a hive and the bees build happily.  I do checkerboard as in the post just before this, and that brings the bees into the box, but obviously they don't need my time or craft sticks to know where to start to build their comb.

I am not finding that crooked comb happens often.  When it does, it's in a hive where there has been a tendency to build crooked comb and many beekeepers suggest that that tendency is a genetic anomaly - not great genetics for comb-building = crooked comb.  

And if you don't correct it, the bees continuously build crooked comb to parallel the mess they made at the beginning.  But mostly the bees build straight beautiful comb from the bare top bar and appear to be happy campers about it.


Sunday, May 27, 2012

Musing about Frames: The Importance of the Tenth Nail, Sturdy Waxing, and the Availability of a Handy Toothpick

Lots of people purchase their frames pre-assembled.  I am not one of those people.  However, I am certainly rethinking this - it takes me 50 minutes to nail together 10 frames using a jig - not very fast, although the jig really helps.  The jig is set up for 10 frames, so when I went through the process three times, I've completed enough for three boxes (but since I use 8 frame boxes, I actually almost have enough for four!)  Waxing frames in takes time too.  This morning I spent one hour cutting and waxing strips into about 50 frames.

Constructing a frame takes 10 nails.

Are you listening, those of you who only bothered to use eight nails?

The tenth nail is the hardest to drive in and makes me say, "*#^#$^)%(#$)," almost every time  However, it is by far the most important nail.  That nail and glue make all the difference in frames that can stand up over time.  The tenth nail is the one that takes me the longest.  I can hammer all eight into 10 frames in 30 minutes.  Then it takes me 20 more minutes to hammer in that $(*)@#*$**^ ( tenth nail into either end bar of 10 frames.


If you don't hammer in the tenth nail (or use glue), the sight below is one you might see.  This is a medium box of honey, but I won't be able to harvest the second frame.  The top bar has become unattached from the end bar and I won't be able to get it out of the box.   This is a frame from 2007, so it is in its fifth year of use (new comb every year), but the parts are wearing out and maybe I skipped the 10th nail at least on this end of the frame.


The frames for the hives at Stonehurst don't have the tenth nail.  I am not in charge of constructing the hive parts over there. I picked up the constructed frames the other day and brought them home to wax in strips.  When I noticed the lack of the 10th nail, I suppose I could have nailed it into place.  It's my nemesis however, so instead  I've decided that if one of the frames over there comes apart like the one above, I'm simply skipping it in the harvest.  And if we order any more frames for Stonehurst, I'll do a better job of educating the guy who is building the hive parts.


When I've given talks about using foundation less frames, I've had beekeepers I respect tell me that they have had strips fall out of frames in Hotlanta weather.  That has never happened to me.  I wonder if perhaps those beekeepers are not waxing in the strips well.

When I put a wax strip into a frame, I run the wax tube fastener up one side of the strip.  Then I turn the frame and run the wax tube fastener up the other side.  When I'm done it's well waxed in and I can't imagine it falling out.

Here's where the handy toothpick comes in (you were wondering, weren't you?).  Sometimes the wax tube fastener looks like it is releasing wax when it isn't really.  Then I take a handy toothpick and unplug the hole in the handle.  Wax flows out easily then and I can make sure the wax strip is being secured on both sides.

One thing I've noticed in using frames from previous years when I have cut out the old comb:  If the old comb I cut out was crooked cross comb, then the bees with the now empty frame, follow the old cell lines and build crooked comb again....even with just a one cell depth of wax left on the frame.

Going forward when I cut out cross comb, I am going to use hot water to melt the old crooked lines off of the top bar and insert a new wax strip.  I may have to put such old frames into a boiling water bath so that the bees, in trying to color between the lines, crooked though they may be, won't have the old lines to use.

Note:  There's a video on this site about how to build a frame.

Friday, April 27, 2012

Stonehurst Hives are All over the Place

In preparation for visiting the Stonehurst Place hives today I waxed foundation into sixteen frames.  I assumed I would need to add a box to at least two of the hives over there.  The last time I was there on April 11, I didn't check the largest hive because a UGS doctoral student was collecting samples of the bees in that hive for his research.


In the service of his research, he probably killed about 300 - 400 of my bees.  But it's for a good cause.  I also had to spend about 40 minutes filling out a survey about how I manage my bees.

So I spent the first part of today waxing frames.  My wax tube fastener kind of bit the dust in the middle - I think it need a long bath fully submerged in boiling water - it seems clogged.


I tried a paintbrush which my friend Jerry says he uses, but just look at the picture.  It did not fare well.


I placed the frames according to Housel positioning in empty boxes to transport them to the inn.


At the inn, I found that Hive One was bursting at the seams, storing honey in comb between the boxes.  I moved the top box off, transferred two honey-filled frames to the new box and inserted the new empty box with the filled frames as ladders between the now sixth and fourth boxes.


I left Hive One with six boxes on it - the top four solid with honey.


Hive Two had a laying queen but the hive was slow to grow.  They had not really used the second box at all.  I didn't do much at all to that box.


Here's their second box - almost unused.


When I was last there about two weeks ago, Hive Three was queenless with about three almost ripe queen cells.  I was sad about this, but this week, I saw eggs - and ripped up queen cells.  The queen has obviously both emerged and started laying.

In contrast to Hive Two, Hive Three had completely filled their second box with nectar.  In the bottom box, they had lots of center-of-the-frame space available for laying and the queen had begun to do so.
I moved two frames of brood, eggs, and honey into what would become the new second box and sandwiched it between the bottom deep and the second box, full of honey.


Posted by Picasa

Sunday, May 15, 2011

Speaking at Young Harris Beekeeping Institute

At Young Harris, I gave a talk on "Simple Beekeeping: A Low-Tech Approach" to the students there. I had to give the same talk four different times, so by the fourth time, I felt a little babbly. But many people told me they enjoyed it and I didn't hear any negative feedback, so that felt great.

I talked for 45 minutes, hitting the highlights of the simple approach to box size (using all mediums), foundation (using foundationless frames), pest management (a homemade SHB trap), melting wax (solar wax melter from a styrofoam beer cooler), and honey harvest (crush and strain).

I demonstrated cutting a wax strip with a rotary cutter.


I showed them how a foundationless frame looks going into the hives.


And, of course, I introduced them to the wax tube fastener and told them my story of learning to use it.


After all, it came with no directions, and I'd like to save others the agony I went through!


The first day the room was crowded and overflowing for each of my two talks and the second day, the room was full for each of the talks, so I felt pleased. I also spent a good amount of time evaluating the practical abilities of the certified beekeeper candidates.

I entered a wall quilt and my creamed honey in the honey show.


My creamed honey came in second place (my friend Julia won the blue ribbon!) and my quilt came in third place.

Julia (who is a great beekeeper and has kept bees longer than I but didn't start the certification process until last year) earned her Journeywoman certification and Noah, her son, and my friend and fellow beekeeper, earned his certified level in the Georgia program.
Posted by Picasa

Thursday, March 17, 2011

Observations about the Wax Tube Fastener

After using the wax tube fastener (which came with no directions) for a few years, I am learning some additional helpful hints and want to pass them on to you. If you want to see my original wax tube fastener saga, you can find it here.

Today we waxed strips into 65 frames for the hives in South Georgia.  To do that many takes a lot of wax.  I melted the wax in my converted Presto Pot that I bought on EBay.

I never use canned vegetables in my kitchen, but I bought a can of asparagus just to satisfy my wax tube fastener need.  You can see the now empty can of asparagus being put to use as a wax container in the photo below.  It's just the right depth for the wax tube fastener.

However, as we worked through the 65 frames, we had to refill the can several times.  As the hot wax level lowered in the can, it was no longer high enough to fill the wax tube fastener completely with wax.  The consequence of this was that the wax residue in the upper part of the tube near the handle solidified, interrupting the vacuum created when you cover the invisible hole on the black handle.

You can see in the photo below from the wax residue on the outside of the asparagus can that the molten wax was about half way up the pipe end of the WTF.

 
To combat this problem, I had two pans of boiling water going on the stove while we worked.  One pan was simply boiling water.  The other heated water contained the filled asparagus can with the wax tube fastener inside the can.

I refilled the can every time it got to about this depth (see photo below).  Because at this point the WTF was not functioning well since the vacuum had been disrupted, while I refilled the asparagus can, I put the WTF in the other pan of boiling water.  This served to melt the wax in the pipe so that the flow could start again.  I lifted the WTF out of the boiling water and allowed every drop to flow out of it before returning it to the melted wax in the can.

This process was much less frustrating than having the tube suddenly appear to quit working.  I also kept a toothpick around to run in and out of the hole in the handle occasionally to keep that path clear as well.

 
My parents grew up in the Depression and instilled in me an approach of "Waste not, want not," so I didn't want to lose any of this precious wax.  It's all I have and when it's gone then I'll have to figure out another way to stick the wax starter strips in the frame grooves.


Meanwhile in the roasting pan that I used to hold the frames I was waxing, I line the bottom with a piece of waxed paper.  We, of course, dripped wax all over the waxed paper.  When the job was done, I put the paper lining, covered with wax drippings, into the freezer.

After an hour in the freezer, the wax dripping just popped off the paper.  I put the peeled and popped off wax into the Presto Pot for future melted wax needs.  I always let the wax cool in the pot, ready to be remelted for the next waxing occasion.
 

And from the Depression era thinking, I am now letting the water cool in both pans from the stove.  In the morning, I'll peel the cooled wax off of the top of the water and add that to my wax collection.
Posted by Picasa

Tuesday, March 02, 2010

My Brother Barry is Becoming a Beekeeper

I was so thrilled because my brother Barry decided that he wants to keep bees. He came to Atlanta for the Short Course in January and went home and ordered equipment. He knows a commercial beekeeper in Natchez, MS where he lives and is getting bees from that man.

I went to Natchez this past weekend to help Barry put his equipment together. I had a great time and didn't take nearly enough pictures, but here's an overview.


We built and painted ten medium hive boxes. I took him two deeps because I believe the man from whom he is getting the bees will be expecting him to have deeps and not medium boxes. So we painted those as well. We also painted screened bottom boards, slatted racks, telescoping covers.

Barry single-handedly built 79 frames (one of the 80 broke!) The Walter Kelley jig for frame assembly is a convenience that I never want to be without. It was so much more efficient to build frames with this jig. Took a little getting used to - we goofed twice and had to take the frames apart to get them out of the jig. Barry became a master of the jig, though, in the end.

We then put wax foundation in all his frames and I set up the two basic hive boxes to show him how to do it. I also showed him how to hang the frame rack on the side, how to remove the second or seventh frame when you first open the box.

He had fun the whole time, but he really smiled when I showed him how to light the smoker.

I hope he will love the bees the way I do and will get into the zen of beekeeping!

Friday, May 04, 2007

Mellona is Bursting at the Seams

Mellona needs a new super. I put one on last Friday with starter frames in Housel positioning. Today that box is filled and all but two frames are fully capped! I was supposed to go to the mountains tonight, but I'm leaving in the morning because I needed to give Mellona a new box....how exciting!

Since I don't know if the Housel positioning was the reason Mellona did so well, I decided to go with it again. Again I didn't make a center frame but rather had the "y"s on each side of center facing up toward the outside of the box.

Mellona is making such beautiful honey that I am setting this super up for cut comb honey. I am using new frames with thin surplus wax foundation in six of them and some new 7-11 foundation that I ordered from Walter T. Kelley company at Michael Bush's suggestion. Michael says it makes pretty cut comb honey. The cell size is halfway between worker comb and drone comb. I put it on two frames and did starter strips on two more frames to fill out the honey super.


Looking at the pictures of these frames, you'll see HP for Housel positioning with an arrow. When you do Housel Positioning, you want the "y" in the center of the embossed cells to be facing upwards on the side of the frame facing the outside of the box. So I noted HP for Housel Positioning and the arrow to indicate which side of the frame should go toward the outside of the box. On the four 7/11 frames, I noted that as well and I put 2007 on these frames to let me know what year I began using them.

I think the picture below will demonstrate Housel Positioning. If you look at the "flower" made of seven cells of foundation in this picture, you can see that the "y" in each cell is facing up. The rougher edges mark the outside of each cell and the "y" is more faded looking.


I used my now trusty wax tube fastener to wax the foundation into the frames and poured the leftovers into my beeswax bar mold and the remainder into a bread pan for the next waxing event!

Posted by Picasa

Thursday, April 26, 2007

How to use the Wax Tube Fastener

After all my difficulties with the wax tube fastener, I figure I am not the only person to be challenged by its lack of directions.....although if I am, the rest of you can enjoy a good laugh at my expense.

Meanwhile to address the problem, I made a video of how to use the wax tube fastener. I forgot to say in the video that to release the wax from the tube, you slightly lift your thumb from the hole in the handle.

Here it is:

Tuesday, April 03, 2007

How to Use the Wax Tube Fastener

You will remember how upset and confused I have been with the wax tube fastener. Michael Bush says to melt the wax in a tin can so that the wax tube fastener has the advantage of having wax higher into the tube. I don't use much canned food, but made a three bean salad from Gourmet magazine the other day and saved the black bean can just for this purpose. Here you see the tin can which is full of melted beeswax, the wax tube fastener in the can, and a Coca Cola can (after all I DO live in Atlanta) being used to keep the tin can upright. You can see the blue of the gas flame below the pot as the wax is melting.


After my problem with Proteus, I am left with the dilemma of not wanting this to happen in Mellona. Michael Bush who will know how I should handle this rarely posts on Beemaster on Tuesday nights, so I am left to my own resources to try to address this issue. I decided to remove three frames from Mellona and give them more help about how to build comb, so I cut a piece of small cell foundation into thirds and inserted it in the bottom groove of these three frames.

Why didn't I use a whole sheet, you are wondering? Well, I had already waxed in a 3/4 inch starter strip in the top groove and was in a huge hurry because I had to go back to work and it was supposed to rain tonight so I had to get this done quickly. I set the frames at a slant in a roasting pan lined with waxed paper.

The slant is for two reasons:
1. The frame is larger than the pan!
and
2. Gravity will cause my bead of wax from the wax tube fastener to roll downhill and thus operate more efficiently.


Here I have removed the wax tube fastener from the tin can, keeping my index finger over the hole in the black handle.


I release my finger and the wax glues the strip into place.


I did find this rather inefficient using only one WTF. It takes a while for the WTF to reheat in the tin can and fill back up again. Maybe repairing my second one so that one can be filling in the tin can all the time is the answer. And there's no obvious way to clean the WTF, although since all it is used is for this purpose, then letting wax harden in it after use may be just fine.

I'm going to give the wax tube fastener another chance, but I think I just threw away $6.50 because I'm not finding it easy or efficient to use. People on Beemaster suggest opening the hole at the tip of the fastener a little wider, making a slightly larger hole in the wood handle and securing the wood handle with a screw to the metal tube....so clearly others have tried to improve on this product -

Or maybe I'll go back to my bread pan method, which I really liked!
Posted by Picasa

Wednesday, March 28, 2007

Frustration of the WTF

Why don't strange inventions come with directions?

My mother gave me a collection of French cookbooks from Le Cordon Bleu and the series had NO INDEX - none of the individual cookbooks (there are more than 20 of them) had indices nor was there a collective index. I hardly ever cook out of those because to find a recipe means flipping pages and I am a busy woman with much more to do with my time.

This wax tube fastener came with NO DIRECTIONS. Now after a long post and many replies on Beemaster, I FINALLY get how to use the thing.

It's supposed to operate like a straw when you dip it into liquid and put your finger over the open end of the straw. You can then lift the straw out of the liquid and no liquid runs out of the straw until you remove your finger from the open end. I understood the principle, but when I received the directionless WTF, I saw a wooden handle and a metal tube. I understood that the metal tube needed to be filled with hot wax then to put the wax in a groove in a frame for the beehive. so I took the second WTF apart and poured wax into the tube. It hardened and of course could not come out of the tube, not to mention that the tube was flaming hot to the touch.
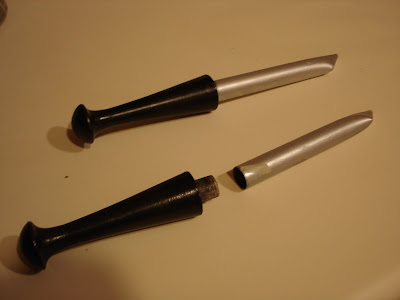
But there's a SECRET about these WTFs.


Without directions and looking at a BLACK wooden handle, only with extremely careful examination does one find A HOLE in the black wood. See picture below. I promise if you simply received this in the mail, you would have a hard time seeing the hole. I had to take three (3) pictures to get the handle at just the right relationship to the camera for the hole to show up.


SEE - it's right there on the lower side of the black handle.

Why doesn't Dadant at least draw a red circle around the tiny opening since they don't include directions? Or paint the wooden handle a lighter color and still put a different colored circle around the hole?

It's just like those blankety-blank French cookbooks without an index.
Posted by Picasa

Tuesday, March 27, 2007

The Sad Saga of the Wax Tube Fastener

I purchased a "wax tube fastener" from Dadant to make securing the starter strips in my frames much easier. Everyone speaks highly of them on the Beemaster forum. This is what a wax tube fastener looks like. It comes with NO instructions beyond the description on the Dadant Internet page. Here are the instructions from that page:
"Wax Tube Fastener is ideal for securing foundation into grooved thin top bar (cut comb and chunk honey) frames. Metal cylinder is filled by lowering into container of hot, liquid beeswax. When cylinder is filled, wax is retained in cylinder by placing finger over air hole. With foundation in place, the wax tube fastener is run along the top bar groove. By removing finger from air hole, a small amount of wax flows out to cement the foundation to the top bar. Each, wt. 5 oz."

So I took the WTF apart (see below), melted my wax and then poured wax into the tube.


The wax immediately hardened - DUH - the tube wasn't hot since I poured the wax in. I was so frustrated that I ended up using the bread pan that I used in an earlier post to put the wax in the grooves for the starter strips. BTW, the BandAid on my index finger is from an injury sustained as I tried to push out the old medium frame foundations (built out fully in comb) from last year so I could substitute the starter strips - Beekeeping is a dangerous business.


When I finished I poured the rest of the melted wax through a run panty hose and made this lovely beeswax bar in a bread pan.


In great frustration, I posted a query on Beemaster about how to use the wax tube fastener - seems lovely in concept, but I couldn't imagine using it. Here's what I asked:

"Last night I needed to fasten starter strips to my newly cleaned medium frames - I melted wax in the double boiler and poured it into the tube. The tube is then very hot and NOTHING comes out of the tiny hole in the tip. I tried to reinsert the wooden handle but it was difficult with the hot tube to hold. The instructions on the product description say to fill the tube by lowering it into a container of hot beeswax and then putting your finger over the hole at the tip - it's hot as H..... - how in the world do others do that? And what about all the wax that will then cover the tube that you are supposed to put your finger over the tip of - hot again as H.... This seems like a masochistic act to me.....

What should I do to make the wax tube fastener functional?
How do the rest of you happy tube users keep from

1. getting burned?
2. dripping wax all over the place?
3. getting the wax to come out of the tiny hole?


Michael Bush (my beekeeping hero) said:

"I put a tin can in a pan of boiling water to melt the wax. When it's melted, put the wax tube fastener in the wax and wait for it to get up to the temperature of the wax. If you don't let it get hot, the wax just congeals inside and won't come out. If you lift it out now and then you'll see if wax runs out the tip or not. Once it's warmed up the wax will have run into the tube. You put your thumb over the hole and pick it up and it's like putting your thumb over the end of a drinking straw to keep the liquid in the straw. When you have the tip of the wax tube fastener over the spot you want to wax you lift your thumb to let the wax run out. I hold the frame at a slight angle to the side and a slight angle down and start at the top. The wax runs down the foundation and the top bar all the way to the other end. When you want to stop you put your thumb back on the hole and move to the other side."

To read the entire thread, click here.

I still am unclear as to how one avoids getting burned when you "lift" the wax fastener out of the melted wax with your thumb over the opening of the tube. I certainly will try again using the MB method.

Note: Apparently (later response from MB on my Beemaster question) you don't SUBMERGE the wax tube fastener in the hot wax but rather hold it in the wax so that the tube doesn't completely fill, leaving the top of the tube available for holding without burning. You can then lift the tube out of the wax to see if wax has gone into the tube and if it is filling. THEN holding your thumb over the large opening, you take the now-loaded-with-wax tube to the frame in which you plan to glue the starter strip.
Posted by Picasa

Preparing for Starter Strips in the Medium Boxes

Michael Bush suggested that to get the plastic based foundation out of the frames, I simply needed to push hard at the center. He did say that I might need to use a tool. Well, after pushing until my finger bled, I got a putty knife and a hammer and suggested rather strongly to the wax holding the foundation to the frame that it might want to let go.


With some hammer and putty knife action, followed by bending the smaller side of the frame (the bottom), I actually was able to snap out the frame as Michael suggested I could. This emptied the medium frames for the starter strips.


I put the comb over plastic from the old medium in a plastic garbage bag. Maybe I'll take it to the next bee meeting and see if anyone wants it - after all, it's drawn comb, albeit large cell.


Then I took the frames for two hive bodies (20 frames) and waxed in starter strips. I'll put the boxes on the hives before I leave for work in the morning. I now have a wax tube fastener, but it didn't come with instructions, but for the life of me, I couldn't figure out how to make the thing work. I gave up and used the bread pan again - worked fine. I now have a metal tube filled with wax that would not for love nor money come out of the tiny hole at the end. I'm going to post on Beemaster to find out how to use the !#$)%&#$%&)@ things.
Posted by Picasa

Pin this post

LinkWithin

Related Posts Plugin for WordPress, Blogger...