Welcome - Explore my Blog

I've been keeping this blog for all of my beekeeping years and I am beginning my 19th year of beekeeping in April 2024. Now there are more than 1300 posts on this blog. Please use the search bar below to search the blog for other posts on a subject in which you are interested. You can also click on the "label" at the end of a post and all posts with that label will show up. At the very bottom of this page is a list of all the labels I've used.

Even if you find one post on the subject, I've posted a lot on basic beekeeping skills like installing bees, harvesting honey, inspecting the hive, etc. so be sure to search for more once you've found a topic of interest to you. And watch the useful videos and slide shows on the sidebar. All of them have captions. Please share posts of interest via Facebook, Pinterest, etc.

I began this blog to chronicle my beekeeping experiences. I have read lots of beekeeping books, but nothing takes the place of either hands-on experience with an experienced beekeeper or good pictures of the process. I want people to have a clearer picture of what to expect in their beekeeping so I post pictures and write about my beekeeping saga here.Master Beekeeper Enjoy with me as I learn and grow as a beekeeper.

Need help with an Atlanta area swarm? Visit Found a Swarm? Call a Beekeeper. ‪(404) 482-1848‬

Want to Pin this post?

Showing posts with label shim. Show all posts

Thursday, March 24, 2011

Installing Ten Packages at Linda T's Bees

Last weekend we installed ten packages of bees into our ten new hives.  We fed each installed hive one gallon baggie of sugar syrup.  We left the bees and will return this weekend to see how they have fared.

Here's what we did to install the packages.  At each hive we put an empty super on over the hive box.  The function of this super is to contain the bees as they are shaken into the hive.  The empty super also serves as a surround to allow interior feeding of the bees both with a baggie feeder and with the jar of syrup that came with them.

Then we pried off the wooden cover over the syrup, worked the syrup feeder out of its place, removed the queen cage.  We took the cork out of the candy end of the queen cage and wedged the cage, screened wire down, between two frames near the center of the hive.  We also tacked it just to be sure.

Next we shook in the bees and either added the baggie feeder before or after adding the bees.

We'll check on them on Saturday this week and see if the queens have been released.

I was working hard through this process and didn't take as many pictures as I often do....but FWIW, here they are:


Monday, September 14, 2009

Thumbs Up for the Freeman Beetle Trap!

After 24 hours under Bermuda, the hive I disrupted so much on Saturday, here's what the tray looked like - Jerry told me to use less oil and it was so much easier to pull out and the beetles were dead, just the same!

The tray picture below was taken on Monday morning after putting the tray in on Saturday afternoon.


The picture below was taken on Tuesday morning after putting the tray in on Saturday afternoon. It's interesting that in the later picture (below) there are even more beetles and that they are concentrated in the same areas.


On the Podcast, I told Jerry I wish he would make one that is half tray, half ventilated screen so we could leave them on the hives in the south. I hope he does so. I'm leaving this full tray on right now
  • Because the hive has been so disrupted and
  • Because our nights are so much cooler right now that the bees are not bearding.
I put a feeding baggie on Mellona - the only hive I haven't been feeding. It is a 10 frame hive so I had a shim I could put around the baggie, making less space for the bees to protect.


You'll notice that Bermuda to the left, has a box surrounding its baggie. I replaced that with a shim today as well.

Posted by Picasa

Monday, September 15, 2008

The Persephone Combo Succeeds

I opened Persephone to find a huge number of hive beetles. I call this first picture "Death by Hive Tool" All of the beetles including the ones congregating in the upper left corner are dead, smashed with my hive tool.

This hive has a shim on it under the inner cover because I need to feed it, but there were so many hive beetles that I think I need to put a trap inside the shim instead. The open area makes for more space that the bees have to defend, so I need to have a purpose for the shim or take it off.


There was healthy brood and larvae in this hive and I feel good about how the newspaper combination worked on this hive. It seems a little light on stores, though, so I need to feed it over the next few weeks. This hive had a hard time succeeding and the bees in it were without a queen at the beginning so they missed the honey flow.


Posted by Picasa

Monday, July 14, 2008

Mayhem and Marauders

When a hive is weakened, as Hyron was by robbing, then the bees and the hive itself become a playground for opportunistic insects. Small hive beetles become bolder. Wax moths may be able to lay their eggs and complete a life cycle. And from the outside there are wasps and other marauders such as the bald-faced hornet shown below.

This is not a good picture of the bald-faced hornet because he is curled around a fighting little bee. I watched the hornet capture the bee just as she left the landing deck of the hive. He wrestled her to the ground. She fought a good fight but in the end, the bald-faced hornet, cannibal that he is, carried her off to feed his young.


The ground in front of the hive that was robbed is littered with bees and pieces of bees. I wanted to cry when I saw it up close. They fought valiantly to protect their hive. Luckily it rained for the next two days and the robbing of the hive has ceased. This picture covers about a square foot of the ground in front of the hive and about three square feet look like this.


The bees are cleaning up in earnest. The robber screen makes it difficult. I always marvel when the mortician bee carries out the dead, flying with a body the same size as her own. However, the pile of dead bees in the corner of the robber screen has diminished, implying that the bees are carrying out the dead in spite of the obstacle of the screen.


I've opened the robber screen to give them about a 3 inch entry which you can see at the top of the robber screen in the picture below. The photo shows a bee aiming to land in the entry and you can see bees crawling up the screen from the landing to enter the hive at its new temporary front door.


I opened the hive today to put on a shim and a baggie feeder. I went full suited because this has been a very aggressive hive. There was no queenless roar and no attacks on me. I don't know if that represents their defeatist approach now that the war is over. Maybe the lack of a queenless roar means that the queen is still alive and survived the attack. And then again, it may mean that the queen is dead but they don't have the spirit to care.

I didn't want to open the hive for inspection because it was 7 PM when I got home from work and because they've been through enough right now. Having me tear apart their house after having marauding intruders a few days ago felt to me like adding insult to injury.

I do feel good as a beekeeper that I gave them a big baggie of sugar syrup, protected this time by a shim. I hope this hive can survive. If it's still alive next week, I'll probably combine it with Aristaeus, one of my other swarm hives. I'll especially make this decision if the queen of Hyron is dead.
Posted by Picasa

Sunday, May 11, 2008

Oops! Used the Wrong Sized Frame

Before I went out of town to a conference in the middle of the honey flow, I put a super on each hive to allow them to use the space to make honey. My smallest swarm hive was one on which I quickly put together a super and threw it on the hive before leaving.

Today I opened the hive to find that I had put shallow frames in a medium super - WHOOPS -

In an inspection I always remove frame #2 as a way to start examining the hive. This allows me to move the frames within the hive - not needing to take each one out unless it seems necessary. Removing this one frame in position #2 also means that when I put the frame back into the hive box, my bees press against each other rather than against the hard outer wall of the hive box. I think I kill less bees on inspection this way.

As you can see the bees in this hive have built combs filled with honey in the space left by having a shallow frame in a medium box. I worried about how to handle this and posted about it on Beemaster.


In the end, I opened the hive up again and took off the medium box with the shallow frames. I scraped off the burr comb and put it in a cake pan. I then added a medium 8 frame with all medium frames (DUH). I took each frame out of the original box and examined it. Most had not been built out. Three had comb attached to the bottom. It's beautiful comb (see picture below), but is not in a useful place.


I didn't want to take the honey the bees had worked so hard to produce. I took the burr comb in its cake pan and put it under the top but on top of the inner cover. This should inspire the bees to move the nectar into the hive itself. I didn't have a shim to put around the cake pan, but I did have several 2X4s cut the right lengths. So I set up a fake shim under the top and set the cake pan there. The bees can clean it up and I'll remove it tomorrow.


Here's the clean new box on this hive (which will have a name before morning - the hive, not the box).

Posted by Picasa

Friday, November 09, 2007

Bee Report - After First Freezing Night


Last night we had freezing temps - not for too long, but long enough for my fig tree's leaves to curl up. This morning I worried about the bees. I was out of town last weekend so I haven't checked them in two weeks, and I didn't know if more food were needed.

I opened the top of Mellona and didn't see a bee. There were a few stragglers on the outside, but I only saw a silverfish on the top cover and no bees. My heart sank....not another absconded hive. It was warmer - about 50 - so I lifted up the second box and under it the bees were clustering! I was thrilled and hoped I didn't chill them too much. I immediately put the hive back together.

I left them with a bag of new 2:1 sugar syrup on top of the frames and took the propping stick out of the tops of both hives.

Bermuda was active and clearly doing fine. I'll give them sugar syrup tomorrow because I needed to make more and it will be too hot to put on the hives until tomorrow. It actually will cool pretty quickly but I can only work on the bees today while my grandson is asleep and he'll wake up before the new syrup cools.

I did other things to help with the cold. I removed the shim that I had put on both hives to help with ventilation and with the small hive beetle trap. I removed both small hive beetle traps to clean and get ready for next year. I refilled their water source which in our drought-suffering Georgia had completely dried up.

FWIW, the weather reports show no rain at any time in the near future.
Posted by Picasa

Sunday, June 11, 2006

Building a more sophisticated robber screen (still for the construction-challenged)

OK, first of all
1. Measure the height of the shim needed to put behind the adjustable window screen and mark the wood.
2. Saw along the marked line

3. At the approximate center of the shim, drill a hole with a drill bit smaller than the center of the thread of the screw you are going to use

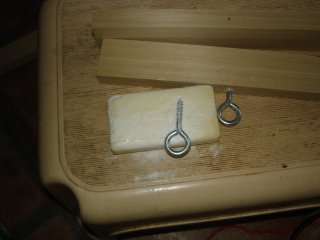
4. Lubricate the threads of the screw by scraping it across a bar of soap....this (for the construction-challenged) helps the screw go into the wood smoothly and with less effort.

5. Screw the screw eye into the sides of the shim, using the drilled hole to help you get started. You can put the blade of a screwdriver into the screw eye to turn it more easily.
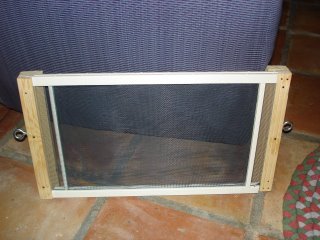
6. Voila! The finished robber screen, ready to be used with bungee cords. Posted by Picasa

Pin this post

LinkWithin

Related Posts Plugin for WordPress, Blogger...