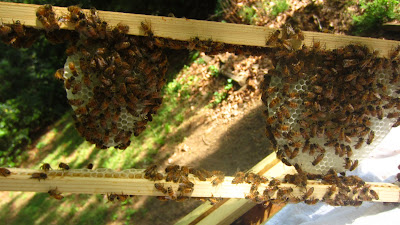
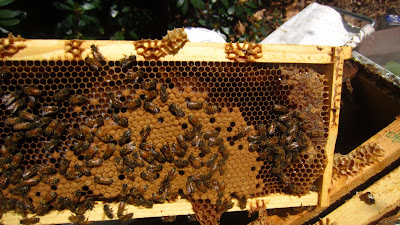
While I was checking on my own hives, I discovered that one needed a new box. I decided to video the process of checkerboarding.
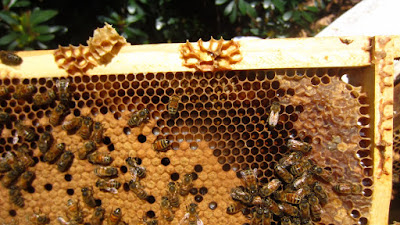
There are two ways to employ checkerboarding to open up space in your hive. First is in the early spring when you checkerboard an overwintered hive to fool the bees into thinking they don't need to swarm because there is plenty of space. In this instance, you move every other frame in the top box of the hive into an empty box and replace their previous space in the old box with empty frames. You do this with the honey box that is typically above the brood nest. This gives the bees more space to use and may interrupt their desire to swarm for more space.
Michael Bush wrote this on Beemaster to explain the basics of checkerboarding:
"For a bee colony:
o Survival is the primary motivation
- Survival of the existing colony takes priority.
- Bees will not do a reproductive swarm if they perceive it to jeopardize survival of the existing colony.
o Survival of the species runs a close second.
- Generation of a reproductive swarm is the secondary objective of every over-wintered colony.
- The over-wintered colony expands the brood volume during the build-up by consumption of honey.
- When the colony has expanded the brood nest to the amount of reserve that they consider appropriate, they are now able to move into the swarm preparation phase.
- The first activity of swarm preparation is to reduce the brood volume by providing additional stores. As brood emerges, selected cells are filled with nectar or pollen.
- Alternating empty drawn combs above the brood nest "fools" the bees into thinking they don't have enough stores yet for swarming and causes them to expand the brood nest, giving both a bigger field force and avoiding reproductive swarming.
During honey production, checkerboarding can help open up room for honey production. In fact the bees will not draw wax or store nectar when there is no nectar flow. I've found during the nectar flow, though, that employing checkerboarding in honey boxes increases the storage of honey. I did this in my hive today (we are still in an ongoing nectar flow).
I use foundationless frames and it is essential to provide checkerboarding when you add a box of foundationless frames. The full frames moved up to a new box provide a "ladder" for the bees to get to the tops of the frames to draw wax.
Here is a video of how to do it:
Showing posts with label ladder. Show all posts
Showing posts with label ladder. Show all posts
Sunday, May 03, 2020
Wednesday, May 02, 2012
Inviting Bees into a New Super of Foundationless Frames
This morning I visited the Morningside Community Garden hives to see how they are doing and to determine if either hive needed a new box. I only had about 20 minutes so it helps to know the purpose of the inspection. Once I've gotten my question answered, I can shut the hive up and go on to work.
Hive One did not need a new box. They have three boxes and they had only built in four of the frames in the new box. Since two of those were ladder frames, in essence they had only drawn out two of the new box's frames.
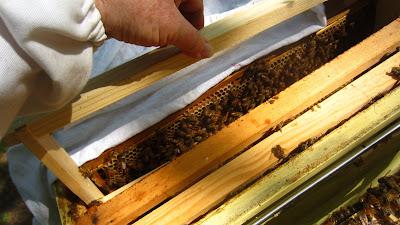
However Hive 2 was a different story. They had built out seven of the eight frames in their second box so it was time to add a third box. The photo below is of frame seven. It isn't completely built out but I still want to add the box.

In a tree the bees build down. I want to put the new box beneath the current ongoing second box. To invite the bees into the super, I need to create a ladder of drawn honeycomb for them to traverse between the two boxes. This will encourage them to build in the new box two which will contain six empty frames and two filled frames serving as the ladder.
I removed two empty frames from the new box to make space for the ladder frames.

In box two, I removed two frames of brood and eggs - in the same position as the two empty frames from the new box.


I put the two brood frames in positions 2 and 3 in the new second box. It helps that they are brood frames because the bees will come into the box to keep the brood warm and fed. You can use honey combs for the ladder, but brood combs are more inviting for the bees.
Below you can see the brood frames moved into position 2 and 3 in the new box.

In box two I pushed the frame in the number 1 position against frame 4 (making it now in position 3) and put the two empty frames in positions 1 and 2.

Now the box is all put back together. The box with the "6" stenciled on it is the new empty box with the ladder in positions 2 and 3. The box above it is the old second box (now box three), full except for the frames in positions 1 and 2 which are foundationless frames, waiting to be filled by the bees.


Hive One did not need a new box. They have three boxes and they had only built in four of the frames in the new box. Since two of those were ladder frames, in essence they had only drawn out two of the new box's frames.
However Hive 2 was a different story. They had built out seven of the eight frames in their second box so it was time to add a third box. The photo below is of frame seven. It isn't completely built out but I still want to add the box.

In a tree the bees build down. I want to put the new box beneath the current ongoing second box. To invite the bees into the super, I need to create a ladder of drawn honeycomb for them to traverse between the two boxes. This will encourage them to build in the new box two which will contain six empty frames and two filled frames serving as the ladder.
I removed two empty frames from the new box to make space for the ladder frames.

In box two, I removed two frames of brood and eggs - in the same position as the two empty frames from the new box.


I put the two brood frames in positions 2 and 3 in the new second box. It helps that they are brood frames because the bees will come into the box to keep the brood warm and fed. You can use honey combs for the ladder, but brood combs are more inviting for the bees.
Below you can see the brood frames moved into position 2 and 3 in the new box.

In box two I pushed the frame in the number 1 position against frame 4 (making it now in position 3) and put the two empty frames in positions 1 and 2.

Now the box is all put back together. The box with the "6" stenciled on it is the new empty box with the ladder in positions 2 and 3. The box above it is the old second box (now box three), full except for the frames in positions 1 and 2 which are foundationless frames, waiting to be filled by the bees.

Friday, April 27, 2012
Stonehurst Hives are All over the Place
In preparation for visiting the Stonehurst Place hives today I waxed foundation into sixteen frames. I assumed I would need to add a box to at least two of the hives over there. The last time I was there on April 11, I didn't check the largest hive because a UGS doctoral student was collecting samples of the bees in that hive for his research.


In the service of his research, he probably killed about 300 - 400 of my bees. But it's for a good cause. I also had to spend about 40 minutes filling out a survey about how I manage my bees.
So I spent the first part of today waxing frames. My wax tube fastener kind of bit the dust in the middle - I think it need a long bath fully submerged in boiling water - it seems clogged.

I tried a paintbrush which my friend Jerry says he uses, but just look at the picture. It did not fare well.

I placed the frames according to Housel positioning in empty boxes to transport them to the inn.

At the inn, I found that Hive One was bursting at the seams, storing honey in comb between the boxes. I moved the top box off, transferred two honey-filled frames to the new box and inserted the new empty box with the filled frames as ladders between the now sixth and fourth boxes.


I left Hive One with six boxes on it - the top four solid with honey.

Hive Two had a laying queen but the hive was slow to grow. They had not really used the second box at all. I didn't do much at all to that box.

Here's their second box - almost unused.

When I was last there about two weeks ago, Hive Three was queenless with about three almost ripe queen cells. I was sad about this, but this week, I saw eggs - and ripped up queen cells. The queen has obviously both emerged and started laying.
In contrast to Hive Two, Hive Three had completely filled their second box with nectar. In the bottom box, they had lots of center-of-the-frame space available for laying and the queen had begun to do so.
I moved two frames of brood, eggs, and honey into what would become the new second box and sandwiched it between the bottom deep and the second box, full of honey.
Wednesday, April 25, 2012
S&C's Bees are Thriving
Sebastian and Christina have this gorgeous side yard full of cutting flowers - yum to a bee!

I checked both hives today and they are THRIVING. I started with the 8 frame yellow hive. These bees were really gentle, despite my earlier experiences. I only wore a jacket and veil, no gloves and barely used the smoker.

In the second box they were almost fully built out. I am going to be gone this weekend so I decided to go ahead and add a box.

I wanted to put a couple of frames of brood from the box on top to make a frame for the new box.
I pulled the frame below and there was her Majesty - at about 6:00 with a yellow dot to make it easier to find her!

There was some nice brood on this frame as well.

I moved two frames into the new box and placed it in the middle position, like the meat on a sandwich. I hope they'll make good use of the box until I see them again. You can see the two used frames in the box below with empty frames for the other six.

So Yellow 7 grew a box.

The story was quite similar on Blue Hive. It is a ten frame box set up, so they had only built out six of the ten frames. Although not quite seven, I decided, given my trip status for the weekend, to go ahead and add a box to this hive as well.

Again, I saw a lot of good young larvae and brood in this hive (but didn't glimpse the queen). I also took two good frames and put them in the new box, placing the new box in the sandwich position. These bees were drawing some not so straight, so I reversed a few frames to make curving the comb impossible. It may confuse the bees but will keep the box from getting out of control.

So both hives are doing well and both have three boxes on them - great for this time of year!

Friday, April 20, 2012
Rabun Report - Bees Doing Well
Rabun County is literally a month behind Atlanta only a couple of hours to the south. In Atlanta, we've been able to plant spring plants since the middle of March. In Rabun county only now is it warm enough to plant anything.
I last checked the Rabun hives on Friday the 13th. It is only a week later, but I had to come to Young Harris to a conference (a psychology conference - the bee institute is in May) so I stopped by again today. I won't be back up here until the Bee Institute at Young Harris on May 10, so I wanted to make sure the hives had plenty of room as it is now the nectar flow should begin up here.
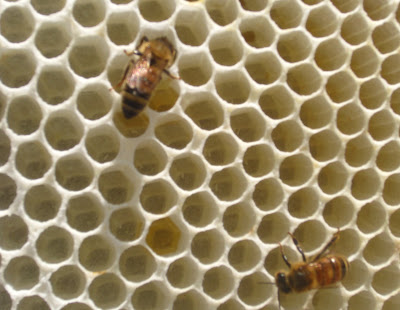
The swarm hive had good bee activity on the 13th (see below)

The queen was laying eggs and you can see c-shaped larvae in these cells.

I saw two bees like the one in the lower center who were completely covered in yellow pollen!

The lovely frame below is one I had stuck in on the side of the box with remnants of old comb. The bees had incorporated the black comb into new fresh wax in the center!

In the blue hive on the 13th the bees were building wax and festooning.

Grass was growing up in front of the hive making access a little difficult, so I took a piece of cardboard and tamped the grass down with it.

Today on the 20th, the bees were making use of the cardboard as a place to drag out the dead. Actually they do that anyway, just without the cardboard, the dead get lost in the grass.

Inside the hive, the bees hadn't used much new real estate. I had brought a new box with me and although I didn't put the box on the hive, I took a full frame out of it and gave them a better ladder in their latest empty box. I didn't put any new box on the green hive either because they are only in half of the second box.

Also in the blue hive, I saw the opened queen cell in the photo below, indicating that the hive had probably swarmed and requeened itself. The queen is laying so maybe I missed this the last time I was here.

I'm trying to keep up with my hive boxes this year so before I left, I numbered these boxes. I now have numbers on all of my 8 frame mediums that are currently on hives. I also have some numbers on the boxes that are stored, not yet used at my house and at Jeff's.
This way I can keep up with where honey comes from (that is to say, which hive produces the honey) and also make an effort to return harvested boxes back to the hive from which they came in an effort to keep the hives healthier.

I last checked the Rabun hives on Friday the 13th. It is only a week later, but I had to come to Young Harris to a conference (a psychology conference - the bee institute is in May) so I stopped by again today. I won't be back up here until the Bee Institute at Young Harris on May 10, so I wanted to make sure the hives had plenty of room as it is now the nectar flow should begin up here.
The swarm hive had good bee activity on the 13th (see below)

The queen was laying eggs and you can see c-shaped larvae in these cells.

I saw two bees like the one in the lower center who were completely covered in yellow pollen!

The lovely frame below is one I had stuck in on the side of the box with remnants of old comb. The bees had incorporated the black comb into new fresh wax in the center!

In the blue hive on the 13th the bees were building wax and festooning.

Grass was growing up in front of the hive making access a little difficult, so I took a piece of cardboard and tamped the grass down with it.

Today on the 20th, the bees were making use of the cardboard as a place to drag out the dead. Actually they do that anyway, just without the cardboard, the dead get lost in the grass.

Inside the hive, the bees hadn't used much new real estate. I had brought a new box with me and although I didn't put the box on the hive, I took a full frame out of it and gave them a better ladder in their latest empty box. I didn't put any new box on the green hive either because they are only in half of the second box.

Also in the blue hive, I saw the opened queen cell in the photo below, indicating that the hive had probably swarmed and requeened itself. The queen is laying so maybe I missed this the last time I was here.

I'm trying to keep up with my hive boxes this year so before I left, I numbered these boxes. I now have numbers on all of my 8 frame mediums that are currently on hives. I also have some numbers on the boxes that are stored, not yet used at my house and at Jeff's.
This way I can keep up with where honey comes from (that is to say, which hive produces the honey) and also make an effort to return harvested boxes back to the hive from which they came in an effort to keep the hives healthier.

Tuesday, April 03, 2012
Our New Chastain Park Apiary
Julia, Noah and I are so honored that we have been given permission to have a "small apiary" at the Chastain Park Conservancy. I'll post some pictures of the conservancy office area later, but for now you can see the golf course in the background.
To get to the Conservancy, I have to drive across the golf cart path, so it's a careful, slow drive to get to the Conservancy….not much different than entering a bee hive. Chastain Park is the largest in the city of Atlanta - 260 acres - so we are taking up a tiny bit of space.
The Conservancy has its offices in a quonset hut - really! It is spacious and amazing in its capacity to serve many purposes, but they do not allow a photo of it to grace the web page so until I take one, I can't share it with you. I also need to take a photo of Chuck, the goat who lives on the Conservancy grounds!
The hives to the left belong to Noah and Julia. We are all starting new packages and all in medium boxes. This should be great if we ever need to transfer a frame of brood and eggs from one hive to another. It is also a lovely space for people to observe an inspection.
We will still keep hives at the Blue Heron. Over there we have 2Cat, a swarm hive that Noah will manage, and Lisa's hive, a donated hive that I will manage. We may occasionally take inspection groups over there as well.

My job at this apiary today was to check to see if my hive had released the queen and if she were laying.
I also planned to remove the feeder if they had built out a full box of wax.

They had indeed built out beautiful wax. You can see eggs in these cells. I was so excited to see how well these bees were doing that I forgot to remove the empty queen cage - oh, well, I'll get it next time.

I also added a new box and moved two frames up to be a ladder to the new box.

Another Bee Day - at Jeff and Valerie's House
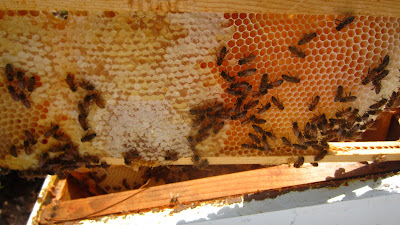
Today I went to Jeff and Valerie's house to check the hives there. I started with Five Alive. Look at the beautiful wax they are drawing. This is the last frame in the box so it is drawn out the least.
The hive was full in every frame except the outside frame, so I decided it needed a new box. I put the new box under the top box and took two frames of brood out of that box to make a ladder in the new box. (A ladder allows the bees passage to start drawing wax from the top bar.) When I took out a full frame, I replaced it with a foundationless frame with a wax strip as in the photo below.
This is what Five Alive looked like when I closed it up - and it's only April 3!

I then went to what we've called the swarm hive but is now Lenox Pointe 2 because we moved the queen by accident into that hive.
They aren't going crazy and aren't building up as fast as other hives, but they are storing lovely honey.
And they are equipped with a laying queen.
If you enlarge the photo below you can also see eggs.

Then I went to the original Lenox Pointe - remember the queen was only laying drones. Well, that was just how she started - now she is laying beautiful brood - you can also see larvae in the photo below.
Her frames are arranged just so - with honey in the corners, pollen next, and capped brood.

Last but not at all least, I opened Colony Square. The top box is a full box of honey and I know they need a new box. Instead of going into the hive (because I knew I couldn't lift the fifty pound full box to position six (over my head), I opened it and added a new box above the top box. I didn't make a ladder with their own frames, but did have two fully drawn frames that I put in the center of the new box to provide ladder facility.
And this is what Colony Square looked like when I left.


The hive was full in every frame except the outside frame, so I decided it needed a new box. I put the new box under the top box and took two frames of brood out of that box to make a ladder in the new box. (A ladder allows the bees passage to start drawing wax from the top bar.) When I took out a full frame, I replaced it with a foundationless frame with a wax strip as in the photo below.

This is what Five Alive looked like when I closed it up - and it's only April 3!

I then went to what we've called the swarm hive but is now Lenox Pointe 2 because we moved the queen by accident into that hive.
They aren't going crazy and aren't building up as fast as other hives, but they are storing lovely honey.

And they are equipped with a laying queen.

If you enlarge the photo below you can also see eggs.


Then I went to the original Lenox Pointe - remember the queen was only laying drones. Well, that was just how she started - now she is laying beautiful brood - you can also see larvae in the photo below.

Her frames are arranged just so - with honey in the corners, pollen next, and capped brood.

Last but not at all least, I opened Colony Square. The top box is a full box of honey and I know they need a new box. Instead of going into the hive (because I knew I couldn't lift the fifty pound full box to position six (over my head), I opened it and added a new box above the top box. I didn't make a ladder with their own frames, but did have two fully drawn frames that I put in the center of the new box to provide ladder facility.
And this is what Colony Square looked like when I left.

Subscribe to:
Posts (Atom)
Pin this post
