Welcome - Explore my Blog

I've been keeping this blog for all of my beekeeping years and I am beginning my 19th year of beekeeping in April 2024. Now there are more than 1300 posts on this blog. Please use the search bar below to search the blog for other posts on a subject in which you are interested. You can also click on the "label" at the end of a post and all posts with that label will show up. At the very bottom of this page is a list of all the labels I've used.

Even if you find one post on the subject, I've posted a lot on basic beekeeping skills like installing bees, harvesting honey, inspecting the hive, etc. so be sure to search for more once you've found a topic of interest to you. And watch the useful videos and slide shows on the sidebar. All of them have captions. Please share posts of interest via Facebook, Pinterest, etc.

I began this blog to chronicle my beekeeping experiences. I have read lots of beekeeping books, but nothing takes the place of either hands-on experience with an experienced beekeeper or good pictures of the process. I want people to have a clearer picture of what to expect in their beekeeping so I post pictures and write about my beekeeping saga here.Master Beekeeper Enjoy with me as I learn and grow as a beekeeper.

Need help with an Atlanta area swarm? Visit Found a Swarm? Call a Beekeeper. ‪(404) 482-1848‬

Want to Pin this post?

Showing posts with label screened bottom board. Show all posts

Sunday, August 06, 2017

SPARK Elementary Phase 2

This week I returned by myself to move the second hive onto cinder blocks and to give it more ventilation. I also moved the hive about one foot from where it was and turned it to give us more room to work on the hive. Before it was jammed in a corner with no work room.


Now we all know you don't move bees in the day time, but this hive is at a school on its rooftop and I only have access during school hours, so there was no choice but to move the hive in the daylight. I was worried the bees would get lost, but also fairly hopeful that all would work out.

Since I was by myself, I needed to move one box at a time. The top cover, inner cover were easy but the top box presented a challenge. The previous beekeeper had pulled one frame, probably last year, to taste the honey and had simply left the space. Bees who detest open space in a hive, hurried to fill the space with comb and honey.


I knew I would have to be very careful as I removed this box. I lifted it straight up into the air, leaving the comb behind standing on the queen excluder.


I lifted box two, queen excluder, honey comb and all at once! Then I covered it as I do all open boxes with a hive drape. In the photo below, I have already moved the bottom box and then set the second box, comb, excluder, and all on top of it.

The bottom box, having sat on the ground for all of this time, is rotting and the seams are splitting. But I didn't have a box to replace it and decided to take care of that in the spring. I don't want to disturb the bees too much this late in the season.

Next I had to move the honey box into place without destroying the upstanding lone comb. This required more dexterity than I am usually afforded, but I was slow and careful and got the job done without breaking comb - well, one tiny break. I pulled the hive drape back as I lifted the box so I could be very careful in replacing the box.

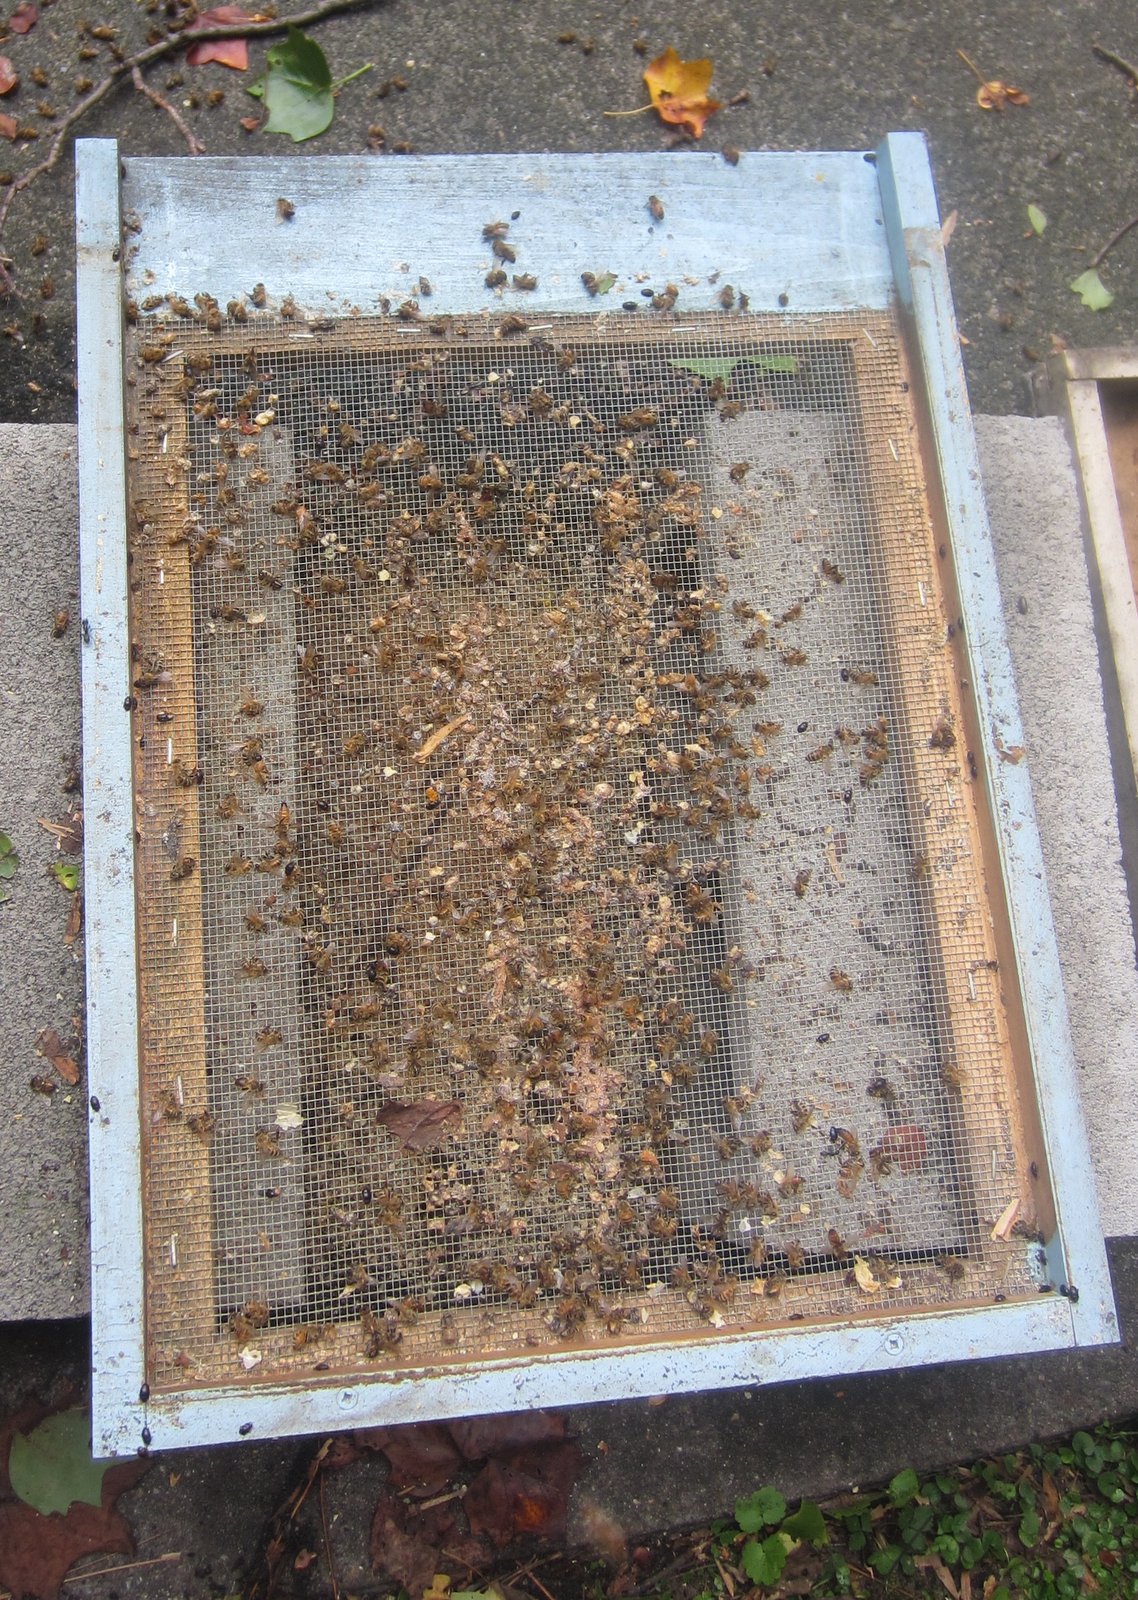
I put the rest of the hive back together - the inner cover and the top cover. Again, I had replaced the rotting bottom board with a screened bottom and a slatted rack. I leaned the bottom board over the entrance to allow the bees on the bottom board a way to climb onto the new hive. You can see the rot. I left the right side open because that was nearest to where the hive had been and I hoped they could smell the queen's pheromone better that way.

"Mama's over here....."

I was a bit worried about the large number of bees flying in the old hive location so I sat down and played on my phone for a while to see if they would find home. I could tell before I left that moving the hive wasn't going to cause too much confusion.


In the right of the above photo next to the school window, you can see what the hive was sitting on - I don't know what that stuff is - the end of a drain pipe and some other odd plastic device.

I opened the "observation hive" nuc that is there and it was filled with roaches and no bees. It makes sense. With both sides uncovered glass, it would have been way too hot and too light for bees in that box. I believe this was the observation hive's first year. 

I'll see if Jeff and I can rig up a wood covering for each side. Then we can make a split from hive #1 at Spark next spring and start the observation hive up again. It would make a good teaching tool for the kids, but with the unprotected sides, it will be challenging to figure out a way to protect the bees from heat and sun.


Saturday, July 29, 2017

Assuming an Apiary - Bees at SPARK Elementary School

When I give talks about bees, I always begin by saying that if you ask ten beekeepers a question, you'll get at least twelve answers. Beekeeping is as much an art as it is a science, and so there are many ways to keep them.

I was asked to become the beekeeper at SPARK Elementary school - the school where my oldest grandkids have been students. So absolutely I wanted to do it. They have had bees for about three years at SPARK - and the beekeeper was an interested volunteer - not a parent or a grandparent. He just wanted to do it. But he was leaving for Army training and needed to give up his bees there.

I knew there would be differences in how we kept bees, and I agreed to meet him and the PTA president at the school in late May to get introduced to the bees there. He had two hives and a homemade observation hive. The school hives are on the rooftop of the building. It's extremely hot up there - in the 90s at least every summer day. And the sun beats down onto the hives.

Here's how they looked:

Hive #1:

Hive #2:
Note: this is from my second trip - on my first trip the hive had four boxes on it. It also had four foot tall weeds directly in front of it and a mountainous fire ant hive diagonally in front of it. The PTA worked hard between my visits to take care of the weeds and fire ants.

Hive #3:
This is a homemade "observation hive." In reality, this is a nuc hive with two deep boxes. On each side of the nuc is glass and there is no cover for the hive.


I keep my bees up off of the ground on cinder blocks, so I didn't say anything critical to him, but I knew that if I were going to be in charge of the hives, one of the first things I would do is raise the hives. They also are on solid bottom boards. 

So I went back on my own and really looked at everything. If you go back and look at Hive #1, I'd be interested in what you observe. SPOILER ALERT: I'm going to put some space in here so as not to reveal anything until you scroll back up to see what you see.


There are three things of note in Hive #1:
1. The bees are obviously in need of ventilation because they are spilled out in a dinner plate sized circle which would have been a beard if they were not on the ground.
2. The top box is coming apart, so the bees are guarding the large opening just under the top cover.
3. The top box has NO handles or cut-ins or grips of any kind to lift it.
HORRORS! 
Note also that I use only 8 frame mediums and these hives are in 10 frame deeps and shallows.

So I went alone on my second trip and realized all of the above. I couldn't get the top box which was full of honey off of the hive. All I was able to do on the second trip was to put beer caps under the top cover to give the hive a little ventilation. I also took a completely empty top box off of Hive #2 and put it on Hive #1 to give them some more circulation.

I also noticed that probably in response to my gasping comment about the observation hive: "They don't have any cover?" that the former beekeeper had draped a beach towel over the hive.

So on visit three I took Jeff, my son-in-law and strong beekeeper, the MABA hive lifter, a screened bottom board, a slatted rack, and a ten frame medium (the only one I own) which, of course, does have hand grips.

This is how the bees looked when we arrived. You can see the extra box I added and can see that it really helped with ventilation since now, although there is still a beard, the bees are not spilled all over the ground. You can see the handle-less box is splitting at each corner.

Jeff lit the smoker. You can see the extensive rooftop garden behind him.

We took the empty box off of the top and covered the exposed second box with a hive drape. We set up the metal hive lifter (on ground surrounding the hive) and moved the hive to one side. You can see the empty dirt where the hive was sitting.


Roaches were enjoying life under the hive.
 We set up the cinder blocks and put the screened bottom board (in photo) and the slatted rack (not in photo) on the cinder blocks.


We returned the old hive to its elevated position. Now to deal with the falling apart hive box.

We removed the hive frames one at a time to the yellow box I had brought. They were all filled with honey - which is great for the bees. And the box was equipped with spacers which spaced the frames so we didn't have to pry up propolis. I've never worked with a box with these spacers and it was a pleasure. I wanted to find a photo of one to show you, but the commercial companies don't appear to carry them any more. You can see the spacer (I thought it was called a rabbet) on the end of the hive box in the photo below if you click on it to enlarge it.

Actually I finally found these on Pigeon Mountain Trading Company. They are frame spacers and turn a 10 frame hive into a 9 frame one by spacing out the frames, allowing the bees to make thicker combs. 


 The former beekeeper had queen excluders on both of the full-sized hives and since the bees are used to that, I left them for now. Next year, I may remove them.


Then we put the yellow 10 frame box on top of the hive and returned the empty third box to the hive.
We walked away from the hive and suddenly I realized that the leaning board was the former bottom board. The bees were not moving into the hive - what if the queen were there? I didn't photograph, but did lean the bottom board against the hive so the nurse bees could walk in, but not before checking well to assure myself that the queen was not outside.

The next day I returned to remove the rotten bottom board and falling apart top box and the bees looked as happy as bees can look.
We'll return next week to put Hive #2 on cinder blocks with a screened bottom board and a slatted rack (if I have 10 frame stuff in my basement). And I'll put an oil cloth cover over the observation hive. There are bees in that hive but none on the outside frames which are totally exposed to light every single day.

Friday, February 14, 2014

Survivor Bees - Hallelujah

Yesterday all of my bee friends were posting on FB and other places that, as the snow/ice was melting, their bees were flying.  My strong little hive in the backyard - my only remaining home hive - was silent all day long.   This hive was a swarm that I retrieved near Northlake Mall in Atlanta.

The people told me that the bees had lived in a column of this condo/office complex for years.  This was the first year they had observed a swarm or called a beekeeper.  I figured this would be a survivor queen.  Nobody had treated these girls in any way for years and that's how I like it.  I didn't take any honey from them and have watched them with growing confidence in their survival over the year.

I hived this swarm in a box with a closed off screened bottom board and I have never pulled out the insert to open the screened bottom.  I don't know if that is helping them make it through the winter or not, but I have hitherto breathed a sigh of relief after every time the temperature returns to the 50s F, and I see that they are flying.

We have had a very cold winter for Atlanta - a week or two of temperatures in the teens and twenties; the Snowjam at the end of January, and now an ice storm of rather scary proportions.  But every time these bees have stayed the course.

Before the sun went down yesterday (it actually came out for a change), when the snow blocking the hive entrance finally melted off around 4:30 in the afternoon, I braved the ice-slick that is my concreted backyard area (a basketball court) to walk up to the entrance .  I saw a couple of bees, but only a couple, and thought that these were the only remaining live bodies.  So I went to bed last night with a heavy heart because my bees were silent.

Today I had a distracting day with my grandchildren.  We made Valentine's cookies (two different kinds) before we went to lunch.

Dylan and Lark and their beautiful cookie creations

My third grandchild, Max, who is 2 was also there, but he was more interested in playing with toys than making the cookies so he isn't in the photo.

After all the baking we went to lunch and at lunch I was telling them that I felt so sad that my bees had died.   I told them that it was warm enough according to the car thermometer that the bees, if they were alive, should be flying, but I had not seen them and I was sad to see that survivor hive go.  

When we returned from lunch, my granddaughter RAN to the back window and looked into the backyard.  "Grandma," she yelled, "the bees ARE flying."  I couldn't believe it and was moved to tears to find that this hive is still going strong.  

My backyard is down in a deep area and it probably was colder than 50 back there for all of yesterday and today.  When the car said 54, they probably finally had a temp by the hive just at 50 and decided to come out to go to the little bee's room (as Dean Stiglitz would say).  

I AM HAPPY.  What a Valentine!

So celebration isn't the meaning of this song, but it is about the difficulties of how we love - and loving the bees isn't much different in the challenges of it.  I love this rendition as do so many others, so I'm embedding this video because my bees are alive today:


Thursday, May 16, 2013

When I Woke Up This Morning, Swarms were on My Mind

Late yesterday afternoon I got an email from a man asking if I wanted a swarm over near Northlake in Atlanta.  The swarm was at an office complex called Northlake Commons.  I didn't see the email until too late last night to reply so I called the man first thing this morning.

Yes, the bees were still there.  Yes, he'd like me to come and get them.

I threw my bee gear in the car and headed over to his location (about a half block from where my daughter Valerie lives).

The swarm was on a Japanese maple in front of the office building.


I felt so lucky it was still there.  I spread a sheet on the ground under the swarm branch.  The tree was on a hill beside concrete steps, so I had to put the sheet down the hillside.

The swarm had originated from a hive that lives in a column on the front of the building.  Even as the swarm hung on the Japanese maple, bees were continuing life in the hive in the column and I watched them fly in and out from the base while I waited for the swarm to gather in my nuc box.


The column is hollow around a metal central pole so there is room inside for the bees to live, but I expect they have to swarm every year to cope with the space limitations.

Because of the location of the swarm, I couldn't just shake it into the nuc box.  I had brought a plastic file box that was the size of a banker's box, so I shook the bees into that first and then poured them into the nuc box.  It took about three shakes to get them all.

Then because the queen was in the nuc box, the bees processed into the box in an orderly way over about 45 minutes.

When they got to this point, I brushed the rest of them into the box, closed up the box, gathered up the sheet and remaining bees and put all of it into my car.

When I got home, I hived them in a two medium box hive.  I closed off the screened bottom board.  At Young Harris, I asked Tom Seeley about the swarm we hived at Chastain that left the next day.  He imagined that it might have been because they were put in a box with a screened bottom board, giving them too much light.  So this box I closed off.  As the summer goes on, I'll probably open it but by then the bees will have claimed this house for themselves.


Within a short period of time the bees were orienting, flying in and out, and seemed to be at home.

It's late in the nectar flow, but maybe these bees can get started and collect enough to get them through the winter.


Saturday, August 04, 2012

The Demise of the Hive

Such a sad feeling to open up a robbed hive.  I avoided it most of the day, but then realized I had to do it - I had to know what the situation was.  I've had robbing before and the hives have made it through but my heart sank when I opened the robbed hive and saw……only dead bees.


I took it down to the bottom.  The bees on the SBB were sad and some were still alive but unable to move to get up and fly.


I looked for the queen in the dead but did not see her.  I did find in one box clustered between the wall and the first frame a handful of bees.  There was still some honey unrobbed but no brood - all those cells which had brood on Thursday - were empty today.

I just feel sick.  I wonder if I did something at the inspection on Thursday to set this off.  Did I open the cappings of honey as I pulled frames from the box?

Then I remembered that the reason I opened the hive on Thursday was because I had seen very little activity and had wondered if something were wrong.  I was surprised to find the hive full of bees.  It wasn't boiling over, but there were bees in every box, new eggs and brood.  I had worried about honey and all of my bees but this hive had plenty of honey (thus the robbery).

I wonder if they had possibly already had problems and the robbing just cinched their fate.

I feel heartsick.  This has been a hard year.  I have had more hives this year than every before, but I have now lost five hives without the winter being the issue.  And most of the losses have been in my own backyard - not in the outyards that I also manage.
Posted by Picasa

Thursday, April 15, 2010

Jennifer Berry Speaks to our Bee Club


Tonight we were privileged to hear Jennifer Berry speak on IPM management of the varroa mite. It's always fun when Jennifer comes to speak both because she is so entertaining and is so full of good information.

First she talked about the Varroa mite and how it reproduces. As most of you probably know, the mite enters the cell just before the cell with the larvae is capped (on about the seventh day). Within the cell, the foundress mite lays her first egg, a male, and then follows with female eggs. She has 13 days in a worker cell to procreate effectively. She has 16 days in a drone cell, so the varroa mite prefers the drone cell.

Jennifer first discussed the ways varroa has been addressed chemically. Beekeepers used a chemical approach, first with apistan (fluvalinate) and later with coumaphos. With the Apistan, mites quickly developed a resistance to the chemical. With coumaphos there were many issues including bad queens who laid poor brood patterns and didn't live long. She had slides from studies showing that drones survived better in hives with no chemicals and that queens had better, more long lasting reproduction with no chemicals.

Thus, we use integrated pest management or IPM, as it is known in the bee world. There are four main IPM approaches: biological, cultural, genetic and chemical.

The biological approach has not worked with the varroa mite. The idea would be to develop a fungus that kills the mite but it has not been efficacious to follow this approach.

The second approach is the cultural one. This includes screened bottom boards, drone brood trapping, powdered sugar shakes, and brood cycle disruption.
  • Bottom screens allow mites to fall or be groomed off of the bodies of the bees and when they fall through the screen, they can't get back up into the hive and onto the backs of a bee. 
  • In drone brood trapping, the drone brood is cut out of a frame or a whole frame is pulled and then the brood is either destroyed or frozen. Since the varroa prefers to breed in the longer developing drone cell, this rids the hive of a lot of varroa. 
  • Powdered sugar seems to be effective, especially when the sugar is sifted over the hive pre-spring brood build-up. This means that the most effective time to do powdered sugar shakes in Atlanta would be between January and March while it is still winter. 
  • Finally brood cycle disruption means doing something to stop the queen from laying. This could include doing a split so that half the hive would be queenless while they make their own queen. It could also include caging the queen for days - Jennifer has done it for seven days; Brother Adam did it for ten. These approaches stop the laying in the hive and since the varroa mite needs larvae on which to lay her eggs, it also disrupts the varroa cycle.
The third approach is the genetic one.  Jennifer encouraged us to buy good queens from breeders who are breeding for hygienic behavior, especially when it comes to varroa mites.  (Varroa Sensitive Hygienic queens are those who breed for hygiene that includes clearing out cells in which varroa lives).

The final approach is chemical.  Jennifer pointed out that she doesn't use Coumaphos or Fluvalinate.  There are a few chemicals that are essential oils with a thymol base that she would consider using.  Jennifer also talked about oxalic acid which is WOOD BLEACH.  She asked would you want that in your hives with your bees?  She also felt similarly about formic acid which is caustic, corrosive to equipment, dangerous for human's eyes, lungs, etc. and hard on bees and brood.  She was not in any way positive about the use of these caustic substances. 

Part of IPM includes understanding the economic threshold.  IPM recognizes that there are pests in the hive and rather than focus on eliminating the pest, the IPM approach is about recognizing when the level of pest in the hive is above a manageable level to a point called the Economic Injury Level, where the hive will be harmed because of the presence of the pest.

Jennifer suggested that at this time of year in general a mite drop in 24 hours of 60 mites or 125 in a larger, more thriving colony, is at the economic threshold.  If your colony measures at that drop level, then you need to do something such as one of the previously mentioned IPM approaches.

In the UGA bee lab, Jennifer is now doing research on the effectiveness of powdered sugar shakes, looking at the timing (doing them before the queen starts laying brood for spring) and the delivery method(top down or bottom up - blowing sugar into the hive from the bottom).

Julia and I left the meeting and decided to put a sticky board under one of the Blue Heron hives with the plan of looking at it on Sunday at our Metro Hive Inspection.

 
Posted by Picasa

Thursday, May 08, 2008

Ventilation and the Screened Bottom Board

I am short a couple of screened bottom boards. I didn't mean to have seven hives, but two swarms came home with me and I had ordered three new nucs this year, feeling sure that one of my hives would die over the winter. The hives lived, the nucs came and I brought home two of the three swarms I caught. As a result two of my hives are on solid bottom boards and they are hot.

My first year when I saw the bees bearding, I was sure a swarm was about to happen, but I wasn't acquainted with Hotlanta beekeeping at that point. Now I know that slatted racks and screened bottom boards make all the difference. Most of my hives have both but the equipment I have ordered to fix the situation on my other hives has been back-ordered for a while.

This morning at 6:30, it is already hot in the less-ventilated hives. Below you can see my apparently queenless hive with bees all over the front porch, even hanging off the front edge. I love the way they cling to each other like circus acrobats. You can see this ability in the close-up of the entry. This hive has a solid bottom board - not good for either ventilation or varroa mite control.


One of my hives out in the yard is on a solid bottom board. The bees here are also gathered on the front porch.


You can really see the effect of the SBB and the slatted rack in Bermuda. Bermuda is teeming with bees, but it has plenty of ventilation so there are less bees on the front of the hive. The bottom narrow piece of wood at the bottom of the stack is the slatted rack on this hive and the whole thing sits on a screened bottom board. Makes a real difference!
Posted by Picasa

Pin this post

LinkWithin

Related Posts Plugin for WordPress, Blogger...