Welcome - Explore my Blog

I've been keeping this blog for all of my beekeeping years and I am beginning my 19th year of beekeeping in April 2024. Now there are more than 1300 posts on this blog. Please use the search bar below to search the blog for other posts on a subject in which you are interested. You can also click on the "label" at the end of a post and all posts with that label will show up. At the very bottom of this page is a list of all the labels I've used.

Even if you find one post on the subject, I've posted a lot on basic beekeeping skills like installing bees, harvesting honey, inspecting the hive, etc. so be sure to search for more once you've found a topic of interest to you. And watch the useful videos and slide shows on the sidebar. All of them have captions. Please share posts of interest via Facebook, Pinterest, etc.

I began this blog to chronicle my beekeeping experiences. I have read lots of beekeeping books, but nothing takes the place of either hands-on experience with an experienced beekeeper or good pictures of the process. I want people to have a clearer picture of what to expect in their beekeeping so I post pictures and write about my beekeeping saga here.Master Beekeeper Enjoy with me as I learn and grow as a beekeeper.

Need help with an Atlanta area swarm? Visit Found a Swarm? Call a Beekeeper. ‪(404) 482-1848‬

Want to Pin this post?

Showing posts with label filtering wax. Show all posts

Monday, July 20, 2015

New Take on the Solar Wax Melter - Trying Something Different

I've got a lot of wax to melt and have been feeling a little frustrated with the solar wax melter method I am currently using. I hate wasting all of those paper towels and you can only do a little at a time with the Tupperware, the paper towel, the rubberband, etc.

So wandering around Youtube, I found another solar wax melter, fancier than my version below, but based on the same idea. I quickly went past the video and haven't been able to find it again, but thanks to whoever provided this idea.

I went to the grocery store and bought aluminum 8X10 cake pans with about 2 inch sides. I took the handy awl I have in my toolkit - don't ask - it's the influence of my father in my childhood and his ideas of what one should have in a tool box. I may have never used it before. I used it to punch holes in the bottom of one end of the cake pan.


I also bought some plastic rectangular boxes and filled the boxes about one inch or so deep with water. I took my reliable on stand-by styrofoam beer coolers and placed a plastic water-filled box in each of them. The box was too large to go all the way down to the bottom but was large enough that it supported itself against the walls of the styrofoam cooler.

Then I put the aluminum pans at a slant in the cooler above the water filled plastic box. I made sure the end with the awl-punched holes was on the lower end of the slant.

I filled the aluminum pans with dry wax particles.


Then I covered the cooler with its pane of glass cover and left them to sit in the sun. Oh, and I lifted the high end up a little with an empty frame as support.


At the end of the day, the wax had melted and gone through the holes to float on the water below; the slum gum was all black and yucky, and I had lost no wax to a paper towel.


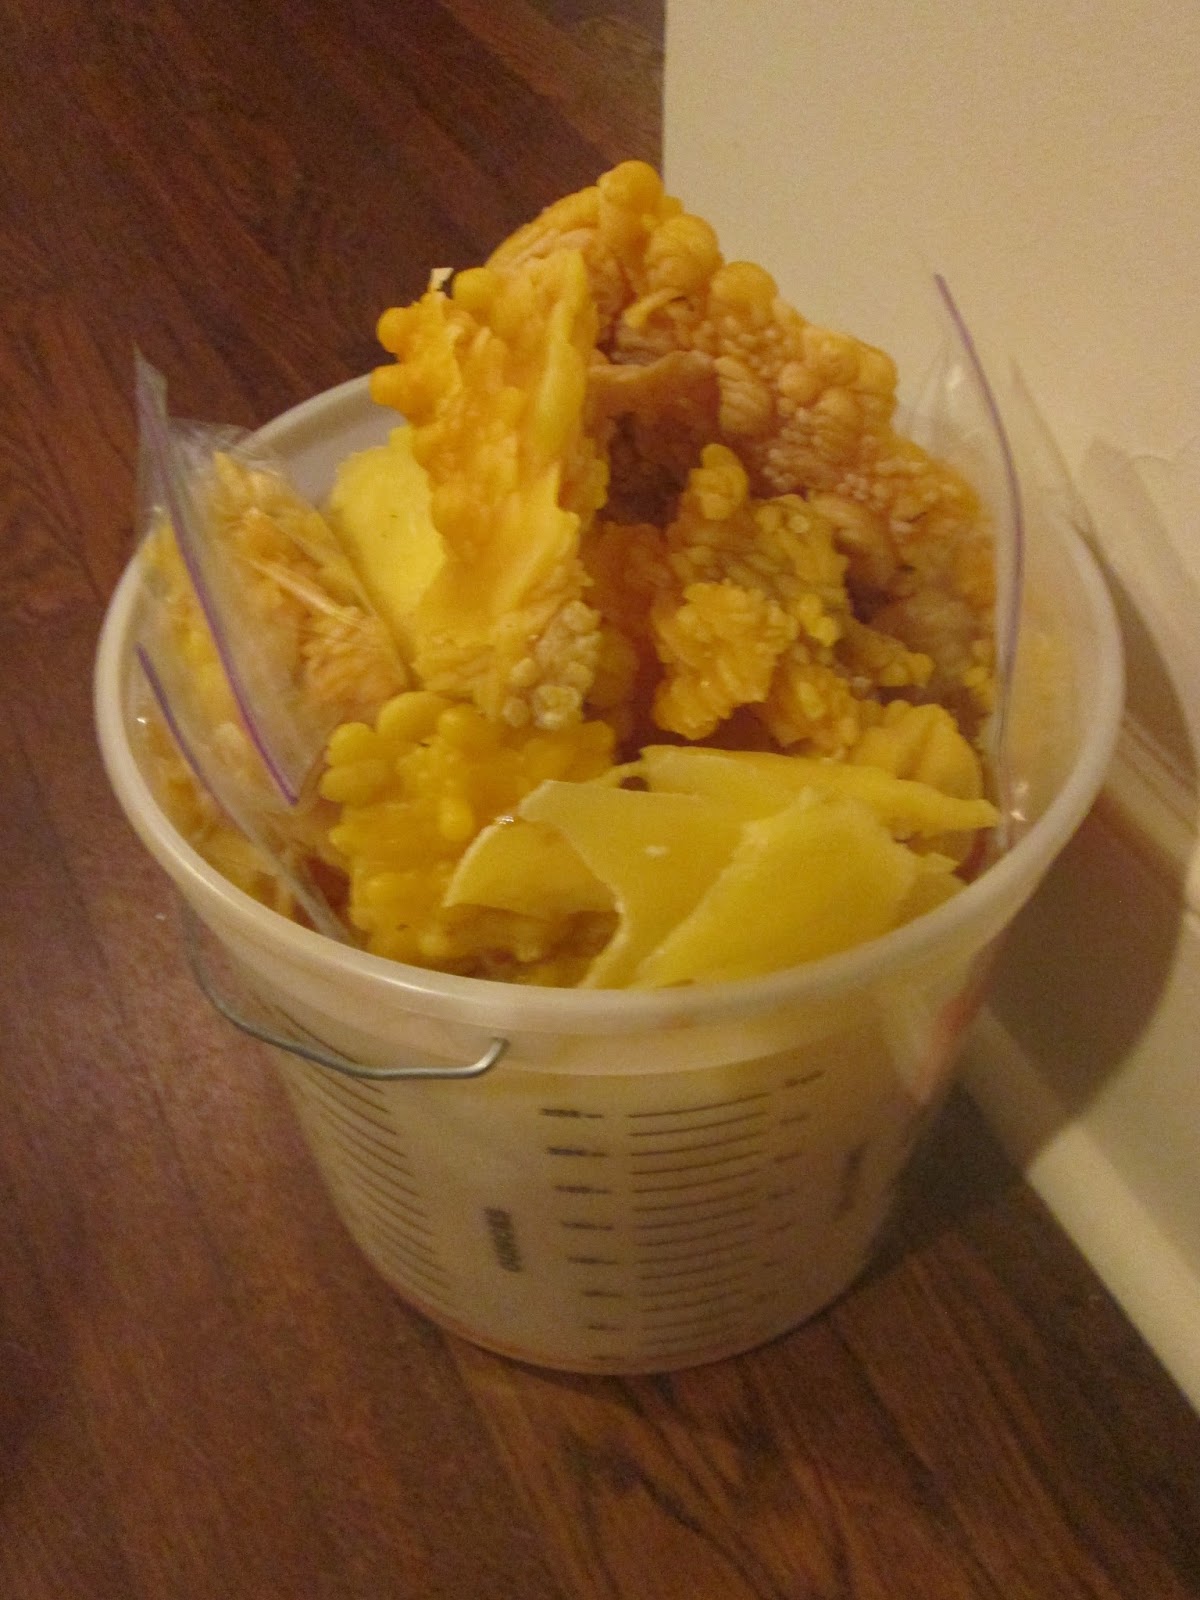
I have been using this for about a week now and have melted a lot of wax. Here's what I have gotten from my efforts so far.

Advantages of this melter:

1. Larger quantities of wax can be processed at a time.
2. No loss of wax to the paper towel filter.
3. The wax is quite clean and shows no need for a filter - all the slum gum stays in the aluminum pan. The water works beautifully as it did in my old melter for providing a surface on which the wax can float.
4. The wax is often in small bits from dripping through the holes - this will be easier to measure for soap and lip balm than having to melt the huge wax block before measuring (that's what's in the small plastic bags in the bucket - small bits of wax)

Disadvantages of this melter:

1. I believe the aluminum pans will have to be replaced after ten or twelve runs
2. At the end of the day, when the sun is no longer beating down, the slum gum hardens to the bottom of the aluminum pan. I've had to put the slum gum pans in the melter for a couple of hours the next day and then wipe them out with paper towels before they are available to use again.
3. The above task requires a pot holder because the pan is so hot and it's nasty to wipe out the slum gum...yuck.
4. Costs from scratch about $15 - $18 to make because the aluminum pans were not cheap...$6 for the styrofoam cooler, $5 for the aluminum pans, cost of glass pane will vary. The other solar wax melter cost about $10 total but melts much less wax and is more bother.


Thursday, October 09, 2014

My Grandson's Science Project

My grandson, Dylan, wanted to do something with bees for his third grade science project.  He likes that I melt wax on the sidewalk in front of my house all the time so he and I decided that he could do a project about wax melting.

He decided to compare filter materials in the solar wax melter.  I have three styrofoam box solar wax melters so he compared three filter materials - coffee filter, paper towel, and silk.


 He measured and weighed the wax shards so that there was a ball that weighed 2 ounces of wax on each plastic container.

Then on a hot but somewhat cloudy day in August, we put all three solar wax melters out on the sidewalk - one with coffee filters, one with paper towels and one with silk.  Dylan said in his report that "we left them out for three days, including nights."

At the end of the experiment, he discovered that his hypothesis (that paper towels would be the best because that is what his grandma used), was wrong.  The coffee filter resulted in the cleanest wax by subjective observation.  The silk, which took three full days to filter through completely, absorbed the least amount of wax, thus resulting in the most volume of wax filtered through.


He and I printed out and put captions on photo of everything he did.  Here he is in front of his board.


I was so proud of him and excited that he wanted me to do this with him.  I hope he'll choose a bee project next year also.


Tuesday, June 22, 2010

Rendering Wax with Cindy Bee

At Young Harris Beekeeping Institute, I went to a demonstration by Cindy Bee on rendering wax. I wanted to see what she does because I now have a number of frames of slimed comb from the small hive beetle and I'd like to capture some wax from them.

Cindy puts gross old wax into an old flannel pillow case. She just pops the wax comb out of the frame and dumps it into the pillow case.


She then puts the full pillow case into this huge pan (it's for frying turkey originally). She has the water heated to boiling on a propane burner.


The wax quickly melts down and she uses this stick to help push it down and out.

The stick helps press the gross scum gum down into the bottom of the pillow case.


Then she lifts the pillow case out of the water and puts it into a colander of sorts that sits at the top of the pan and drains.


She wears gloves so as not to get burned and presses down on the solids in the bag.


Then she dumps the remains (the slum gum, as it is called) into a box and discards it.


She leaves the pot to cool and when all is said and done, she has a ring of wax.  It still needs more processing to be usable but at least some wax is recovered from useless frames or old comb.


I've bought some equipment - not as sturdy or sophisticated as this, but I'll report on my own wax rendering a la Cindy Bee in the next day or two.
Posted by Picasa

Monday, June 29, 2009

The Value of a Silicone Mat in Honey Harvesting

I love using the silicone mat when I do crush and strain honey. It's merely a silicone cutting board that I bought at the DeKalb Farmer's Market in Atlanta. It perfectly fits the pan I use for crushing the honeycomb.

Here is the mat in the pan - it doesn't quite go end to end in the pan, but that makes it easier to pick it up to transfer the honey and comb to the straining bucket.


Here it is with one frame's worth of crushed honey on it, ready to be transferred to the straining bucket.

Now, this is why I love the mat. It has flexibility so that it can curve around and guide the honey and comb into the strainers. It can be easily lifted out of the pan and moved, honey and all to the bucket. It has an easy surface for using a rubber spatula to get the remaining honey off of the mat and into the bucket.

Here's what a full bucket looks like. I actually split this super into two buckets since a couple of the frames had very light honey in them and I wanted to keep them apart from the much darker honey in the other frames.


In general the comb I am harvesting this year is much less full than the last three years. I think this demonstrates how much the bees lost in making and capping honey when we had weeks of constant rain during the honey flow.
Posted by Picasa

Sunday, June 21, 2009

First Honey Harvest of 2009


Here is my daughter Valerie with the first jar of honey harvested in 2009!

Today I harvested for the first time in 2009. I had two excellent honey helpers, my daughter Valerie and my grandson Dylan. We first cut the capped honey off of the frame and let the pieces drop into the prepared pan.


Then Valerie and Dylan crushed the honey comb with their pestles.

My job was to take the honey-laden silicon mat and scrape as much honey as I could off of it and into the filter bucket.

Dylan helped with that as well. We then put the filter buckets out in the Hotlanta weather to encourage the honey to filter through. They each took home a jar of their honey harvest.


To see a more detailed view of crush and strain, visit my video on crush and strain honey harvest.
Posted by Picasa

Sunday, April 15, 2007

Wax Melting and Filtering Part Two

I stirred the wax in the double boiler with chop sticks so that I could throw them away later.


I set up half of a waxed carton with panty hose stretched over it as a filter. Then I poured the leftovers from crushing and straining my honey last year through the filter. Left on the hose is junk from the wax including bee parts, trash, bugs, etc.


I wish I had filtered into a coffee can because I had a hard time getting the wax out of the waxed carton. I need to learn how to manage the wax from crush and strain differently. What I did was crush the wax and when the honey was all harvested, I washed the wax that was left.

Inevitably there was water in the bag with the wax pieces. It froze with the wax as tiny droplets on the individual wax pieces. When I poured the first wax through the filter, there was water in the melted wax. As the wax cooled it hardened around the water. So when I took the hardened wax out of the carton, water went everywhere. It was a mess, actually, and I lost some wax in the process.

If I had poured the water-laden wax into a coffee can, I could have poured the water out when the wax had hardened and then put the metal can into boiling water to remelt the wax. There has to be a better way to deal with the water, so I will visit some candle making books and web sites to find out.

The end result is that I remelted the now-filtered wax again in my double boiler and poured it into two bread pans to cool.


Below are the bars I made in bread pans from my wax. Next time I want to wax in starter strips, I'll have filtered, pure wax bars to melt for sticking the strips in the frames.
Posted by Picasa
When a beekeeper harvests honey, everyone says, "Don't do it in the kitchen because honey will be everywhere." I did my entire harvest in the kitchen without making a mess. I managed the honey harvest without a sticky kitchen.

Melting wax is quite another thing. Wax drips and pieces are everywhere in my kitchen after this process. I scraped wax off of my stove for a long time after I finished. Realizing that I don't want to do this to my stove ever again, I bid (and lost) on EBay for a hot plate. I'll get one on EBay or somewhere else before I melt wax again so the process can take place in my basement!

Pin this post

LinkWithin

Related Posts Plugin for WordPress, Blogger...