Welcome - Explore my Blog

I've been keeping this blog for all of my beekeeping years and I am beginning my 19th year of beekeeping in April 2024. Now there are more than 1300 posts on this blog. Please use the search bar below to search the blog for other posts on a subject in which you are interested. You can also click on the "label" at the end of a post and all posts with that label will show up. At the very bottom of this page is a list of all the labels I've used.

Even if you find one post on the subject, I've posted a lot on basic beekeeping skills like installing bees, harvesting honey, inspecting the hive, etc. so be sure to search for more once you've found a topic of interest to you. And watch the useful videos and slide shows on the sidebar. All of them have captions. Please share posts of interest via Facebook, Pinterest, etc.

I began this blog to chronicle my beekeeping experiences. I have read lots of beekeeping books, but nothing takes the place of either hands-on experience with an experienced beekeeper or good pictures of the process. I want people to have a clearer picture of what to expect in their beekeeping so I post pictures and write about my beekeeping saga here.Master Beekeeper Enjoy with me as I learn and grow as a beekeeper.

Need help with an Atlanta area swarm? Visit Found a Swarm? Call a Beekeeper. ‪(404) 482-1848‬

Want to Pin this post?

Monday, May 14, 2012

It All Adds Up

**


  • 0: the number of chemicals or pesticides I use in my hive.
  • of an inch: bee space.
  • 1: the number of queens in most beehives
  • 1: the number of times a worker bee can sting
  • 2 days: the amount of time in which a larva can still become a queen if fed royal jelly
  • 3 times a month: the number of times I inspect bee hives during bee season
  • 3: the number of segments to a honey bee body.
  • 4 minutes: the amount of time it takes for a honey bee to remove and manipulate a scale of wax exuded from the abdomen of a bee (4th to 7th abdominal segments if you are interested!)
  • 4 - 5 pounds: the approximate weight of a full medium frame of honey
  • 4.9 mm: the width of a natural-comb worker brood cell.
  • 5 : number of eyes on a honey bee
  • 7:  the number of hives I have in my Virginia Highlands backyard
  • 8 feet:  the average height of a wild colony inside a tree
  • 8: the number of frames I use in my hive bodies
  • 9 ODA:  9-oxodecenoic acid or queen substance - queen pheromone
  • 10 nails: the number required to build a frame properly
  • 10 - 15 trips a day:  the number of times nectar and pollen gatherers fly out
  • 12 - 25 days:  The age of most guard bees
  • 16 days:  the number of days it takes for a queen to emerge
  • 17: the number of states having the honey bee as the state insect
  • 17 - 30: the number of drones needed for a well-mated queen
  • 18.6% moisture: the maximum moisture content a honey can have and not ferment.
  • 20 times its own weight: the amount of honey a comb can support
  • 21: Current number of Master Beekeepers who have earned their certification from the Young Harris Beekeeping Institute
  • 21 days: the number of days it takes for a worker to emerge
  • 24 days:  the number of days it takes for a drone to emerge
  • 24 km/h: average honey bee flight speed
  • 25: the number of talks I’ve given to bee clubs and others since January 2011
  • 36: the number of days from egg to sexual maturity for the drone
  • 40 liters: the size of a hive cavity
  • 56:  the number of workers a single worker touches with her antennae in 30 minutes
  • 96.8 degrees Fahrenheit:  the temperature of the core of the brood nest in a hive
  • 120 degrees: the angle between adjacent cell walls in honeycomb
  • 600-800 meters: the average distance a swarm moves from its parent colony
  • 800 km:  The distance a forager accumulates in foraging flights before her death
  • 1000:  The number of posts on this blog as of this very moment!
  • Infinite: The amount of joy and pleasure I get from beekeeping and the amazing  people and experiences that it brings to my life............


**Many thanks to Noah Macey for all the help he gave me with this post.

Sunday, May 13, 2012

Death by Drowning, But Revival by a New Queen

My flower pot swarm trap caught a swarm that I called Little Kitten because it was so small.  I think it was a secondary swarm and was relieved to find that finally a mated queen was laying in the wax comb.

I had a Boardman feeder at the entrance of the nuc - and those of you who have used Boardmans know that they are not designed for a nuc.  To combat the instability I put a package container under the feeder with a small block to support it.  However, one night our evening raccoon or maybe my dog, Hannah, had bumped into the Boardman, turning over the feeder bottle.

By the time I discovered the mishap, there was a pool of sugar syrup all over the bottom board of the nuc and bees were having a terrible time negotiating entry to the hive.  It could have been like that for several days - I don't always look at the hives every single day.  I put the hive on a new bottom board and cleaned up the old one.  Then I returned it to the hive and put it all back together.

Sadly, either the queen drowned that night - death by raccoon/Hannah/sugar syrup??? - or the bees, upset with the state of things, balled her.  The hive was queenless.

I put frames of brood and eggs into the nuc.  They didn't really succeed at making a queen.  There was one small queen cell - obviously an inadequate job (1/2 inch long at best) - and the handful of bees now left could not have managed to take care of it.

My friend Jerry ordered 20 virgin queens from Zia and offered me the opportunity to buy one.  Zia Queen Bees is a family operation breeding survivor queens.  I believe this is the answer to the mite problem - not poison.  I snapped him up on it, got the queen on Wednesday night.  She was alone in the queen cage.  Jerry suggested that I feed her a drop of honey and a drop of water when I got home and that I install her the next day.

An amazing experience but with no pictures:  I put a drop of honey on the end of my finger and held it next to the openings in the plastic queen cage.  She stuck out her proboscis and sucked the honey off of my finger.  I will never forget the experience.  I knew the water wouldn't stick to my finger, so I put it in a spoon and watched her drink, but I wished I could repeat the honey drop!

The next day, Thursday, I was scheduled to give a bee talk at 7 PM and from there to drive to Young Harris, so I had a packed day.  I luckily had a two hour break in my professional day (but only 2 hours) so I drove to Valerie and Jeff's to get frames of bees to create population for the small Kitten.

Jeff has been busy adding boxes to these hives and this is how they looked:


All of these boxes are full of honey and I can't lift the top box on these hives without a ladder and help, so I opened the hive I call Lenox Pointe (second from the left in the collage above).  I took two honey frames with bees from the top box, checking very carefully for the queen.  I did this because I could take honey frames out of the top box without having to lift it off of the hive.  I put these in a nuc I had waiting.  I took three frames - two of brood and bees and one of mostly pollen and honey from the Swarmy hive - the mostly yellow hive on the right in the collage.

I shook a few extra bees, but didn't worry about that as much as I would normally since I am adding this "split" to Little Kitten where there are already some under employed bees.


I had to be back at my office at 1:00.  When I finished at Jeff's, it was 12:25 and I had a 20 - 25 minute drive back to my house.  I drove in my bee jacket as quickly as I could within the limits of the law.  When I got home it was 12:50 and I needed to be at work in 10 minutes.  

I walked the nuc through my house to save time because the nuc is on my deck.  I opened it, took out the frames and put them in a second nuc box on Little Kitten without disturbing the bottom box.  Then I took the queen out of my top pocket and put her cage between two frames, put the inner cover back on, and ran into the house, stripping jacket, etc. as I went.


Oh, and I put an end bar on the entry to give them an entrance reducer of sorts.


I threw on my business clothes, jumped in the car (my office is 5 minutes from home) and got to my appointment there at 1:05.


Returning from Young Harris, I found the bees happily flying in and out of the hive and seemingly satisfied with their new housing. I'll check tomorrow to see if the queen has been released and then leave them completely alone for three weeks.
Posted by Picasa

Saturday, May 12, 2012

Young Harris Beekeeping Institute 2012

Home from Young Harris Beekeeping Institute today and I'm exhausted.  This, for me, is the end of seven weeks of over-commitment and now it's setting in that I am TIRED.

Young Harris was great in so many ways.  I learned a lot and heard some good speakers:  Juliana Rangel from NC State and Gary Reuter from the University of Minnesota, in particular.  I also taught two workshops on Low Tech Beekeeping and tested the candidates for Certified Beekeeper on their practical exams.

Julia and Noah went also.  Noah earned his Journeyman certification - he's only 15 and I imagine he's one of the youngest, if not the youngest, person to get this certification in Georgia.  He is such a knowledgeable and excellent beekeeper, and I love being associated with him.

I couldn't believe that I left my camera in Atlanta so I couldn't take photos of Noah and Julia in their moments of reward, but I've put in pictures of them in inspections that we have done together.


Julia who earned her Journey(wo)man last year, this year went for her Master Beekeeper and she DID IT!  I have loved working with her over these years and was sure she would achieve this.  There's an old saying that if you ask 10 beekeepers a question, you'll get 10 different answers, but Julia, Noah and I generally think very similarly and agree in philosophy.  I feel lucky and really privileged to be friends with and to keep bees with both Julia and Noah.


I didn't enter any honey in the honey contest - all of my cut comb has been opened and shared with others; my liquid honey is beginning to crystallize, and I never got around to making a wax block or creamed honey, so I didn't have any honey to enter.

I did enter the "art" category of the honey show with the quilt I've made for my newest grandson:  Max who is now five months old.  Jeff, who is his father, keeps bees with me, and he and Valerie decorated Max's room in bees.

I've worked on it for six months and was thrilled to win a blue ribbon.  I've made a number of quilts in my life, but this is the first quilt that I actually drew the design myself so it is totally original.  The six honey bee blocks are based on a traditional quilt block but I made the heads smaller like a real honey bee and put a floral block in the center.


So now I'm going to slow down for a month or two and take better care of myself…..but I will still be sharing my bee life with all of you.
Posted by Picasa

Wednesday, May 09, 2012

Bees: A Little of This, A Little of That

Yesterday I inspected all the hives at home.  Finding lots of little tidbits of interest, I decided to post a hodge-podge of them, so here goes:

I saw a perfectly lovely queen in SOS2.  She was gliding slowly, unfazed by my arrival in the hive, over her creations and paused so that I could take her photo.  Isn't she pretty - I love the golden queens that my bees often raise.


It has (finally) begun to rain in Atlanta - we've now had several days of it.  My garden is green, and the nectar flow may get a last hurrah with the extra push of moisture from the universe.  Below you can see my water source.  It's a plant saucer sitting on an upturned pot.  Inside that plant saucer is another one filled with rocks so that the bees have somewhere to light while taking in the water.


I fall in love with the bees all over again every time I pull a foundationless frame and find that they are creating comb.


Remember the frames that have stood around untouched until the nectar flow began to diminish?  There have been bees all over them for the past few days and now every cell has been ripped open and all the honey robbed out.


The shards of wax cappings on the ground attest to the robbery.  That is a way that you can tell if your hive has been robbed.  In a working hive, the bees are quite conservative with the wax - they reuse the caps of the brood cells, they move wax from one place to the next.  But in a robbery, the bees are not invested and tear the cappings off, dropping them wherever they may fall.


Early in my beekeeping, when I was still using sheets of wax foundation, I put a box of wax foundation frames as a new super on the hive .  Later that day, I stood by the hive and could hear a definite crunching sound.  I even posted on Beemaster about it because it was such a strange sound.  I came to discover that the bees were chewing the wax out of the new frames and taking it to a place in the hive where it was needed!

Imagine hearing crunching coming from your hive!

My bees in these hives have really been collecting nectar.  They've built some pretty fat honey comb as you can see in the photo below.


I'm off to Young Harris tomorrow night and will be teaching "Low Tech Beekeeping" there on Friday afternoon at 1 and at 2 in room 106.  If you are there, be sure to speak to me and introduce yourself as someone who reads this blog.
Posted by Picasa

Monday, May 07, 2012

Signs of the diminshing Nectar Flow

In Atlanta our nectar flow is tied to the bloom of the tulip poplar.  When the tulip poplar is done, the nectar flow is pretty much over.  We will continue to have nectar sources and we always have a little bump in the availability of nectar when the sumac and catalpa bloom in late June/early July, but for now, it's over.

This has been a funny spring.  Everything is two weeks earlier than last year.  The privet hedge bloomed in coincidence with everything else, and it will be interesting to see how that flavors the honey.

If I couldn't look up in the tulip poplars above my backyard and see that the bloom is done, I could tell that the nectar flow is over by the behavior of the bees.  They are still primed to collect nectar and disappointed that it has almost suddenly stopped.

They indicate that it is over by collecting honey wherever they can.

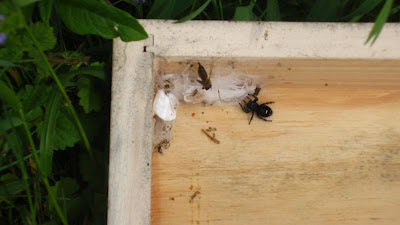
I had the two frames below sitting under my deck since January when I discovered that my hives in my backyard had died.  These frames had been somewhat slimed by the small hive beetle and the bees ignored them…….that is, until today.  Today there are bees robbing out these two frames like crazy.


Also I have lots of wax under my house cut out of frames and waiting for Jeff to build us a bigger solar wax melter.    Some of that had remnants of honey in it and you can see bees all over the comb in the foreground.


Another way to tell that the nectar flow has ended is that the bees have slowed down in building comb.  Whether you use foundation or not, when the nectar stops, the bees stop drawing wax.  They have to have resources to build wax and without nectar, they have no fuel.

When you have foundationless frames, it's quite obvious as you can see in the empty hive box below from Morningside.  If you use foundation, there's an illusion that something is going on because each frame is full (of plastic foundation, that is) but in those boxes as well as my foundationless boxes, NOTHING is happening in Atlanta today.


Posted by Picasa

Saturday, May 05, 2012

Location, Location, Location: What a Difference a Zip Code Makes

My hives in my Atlanta locations: 30342, 30306, 30316 are thriving.  I have honey boxes on all of the overwintered hives, sometimes stacking up to seven boxes.  The new hives are rocking along as well, with most now up to three boxes on the hives.

My hives in Clayton (30568) are a different story.  The nectar flow in Rabun County about 120 miles north is about a month behind Atlanta.  So these hives are really moving slowly.

A lazy spider has the luxury of creating her abode under the top cover of the Rabun Blue hive.


That hive hasn't drawn out the box I gave it on the 20th of April.  I adjusted a few things but didn't add a box although I had one with me for that purpose.


The frames in the top two boxes that were being used were filled with nectar, which is a good sing, but none of it capped as it would be in Atlanta.


The green swarm hive in Rabun is drawing that pretty yellow wax I frequently see in hives in Rabun at this time of year.  And they are raising brood and growing.  But they, too, didn't need any more space.


By the way, I think this swarm came from a feral hive that lives in this old abandoned school that is on the edge of the meadow where the community garden is.  I've shown pictures of this hive before.  I walked over to look at it on Thursday when I was there, and they were still busy as bees.


Posted by Picasa

Wednesday, May 02, 2012

Inviting Bees into a New Super of Foundationless Frames

This morning I visited the Morningside Community Garden hives to see how they are doing and to determine if either hive needed a new box.  I only had about 20 minutes so it helps to know the purpose of the inspection.  Once I've gotten my question answered, I can shut the hive up and go on to work.

Hive One did not need a new box.  They have three boxes and they had only built in four of the frames in the new box.  Since two of those were ladder frames, in essence they had only drawn out two of the new box's frames.

However Hive 2 was a different story.  They had built out seven of the eight frames in their second box so it was time to add a third box.  The photo below is of frame seven.  It isn't completely built out but I still want to add the box.


In a tree the bees build down.  I want to put the new box beneath the current ongoing second box.  To invite the bees into the super, I need to create a ladder of drawn honeycomb for them to traverse between the two boxes.  This will encourage them to build in the new box two which will contain six empty frames and two filled frames serving as the ladder.

I removed two empty frames from the new box to make space for the ladder frames.

In box two, I removed two frames of brood and eggs - in the same position as the two empty frames from the new box.


I put the two brood frames in positions 2 and 3 in the new second box.  It helps that they are brood frames because the bees will come into the box to keep the brood warm and fed.  You can use honey combs for the ladder, but brood combs are more inviting for the bees.

Below you can see the brood frames moved into position 2 and 3 in the new box.


In box two I pushed the frame in the number 1 position against frame 4 (making it now in position 3) and put the two empty frames in positions 1 and 2.

Now the box is all put back together.  The box with the "6" stenciled on it is the new empty box with the ladder in positions 2 and 3.  The box above it is the old second box (now box three), full except for the frames in positions 1 and 2 which are foundationless frames, waiting to be filled by the bees.

Posted by Picasa

Tuesday, May 01, 2012

Organic Gardening Magazine Article

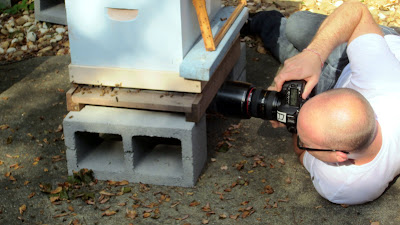
In their October/November issue, Organic Gardening Magazine will include an article by Janet Davis on beekeeping featuring three beekeepers - one in Vancouver, one in Chicago, and me!  Yesterday a photographer for the magazine, Greg Miller and his assistant, Tim, spent about three hours at my house shooting pictures of the bees, me, my house, my bee things.  It was such fun.

Greg has taken a number of beekeeping assignments for various magazines so he was not at all afraid to lie down right next to the hive to get a good shot of the girls as they flew in and out of the hive.


I can't wait to see his shots in the magazine.  If you follow the link to his website, his lead photo is a shoot he did of another beekeeper and his son.


When he finished with this hive, we opened almost every hive in my bee yard to look for various photo ops, but my favorite moment was one when he showed me how he captures a sunbeam…..he had the smoker puffing into the area where sun was shining through the leaves of the trees and the smoke delineated the sunbeam - I could see the sunbeam as if it were a concrete object…..just gorgeous.


Posted by Picasa

Pin this post

LinkWithin

Related Posts Plugin for WordPress, Blogger...